How to Measure a Bike Frame — Our Easy-to-Follow Guide

Finding the correct size bike is tricky because of the massive variation in how manufacturers measure and list their frame sizes, making the label they choose sometimes misleading.
This lack of standardization means it’s beneficial to understand some of the individual measurements listed on bike geometry charts. Then, when you’re on the hunt for a new bike, you can choose a size accurately.
Buying an appropriate bike size is essential for all bike styles as a poor fit is uncomfortable, inefficient, and can cause injury when cycling. However, this is most notable for road bikes because of the disproportionate impact on comfort and the power you can generate.
This article will outline how to measure a bike frame, the most important measurements, how they interact, and how they influence handling and fit, so you can make an informed choice next time you’re buying.
Key Bike Measurements
Knowing how to measure the size of a bike and which measurements are the most important will help you judge whether or not a bike is an appropriate size. If you currently have a bike that fits you, take its measurements for reference when searching for a new one.
You can take almost all of the measurements in this article with a tape measure. However, you will require a spirit level for some of them, such as when measuring the length of a sloping top tube and seat tube.
It’s best to use metric units for your measurements, as manufacturer geometry charts are typically in centimeters (cm) or millimeters (mm); one centimeter equals ten millimeters. If you don’t have a metric side to your measuring instrument, you can make the conversion by multiplying your measurement in inches by 2.54 (2.54cm = 1 inch).
Bike Frame Geometry: Fit vs. Handling
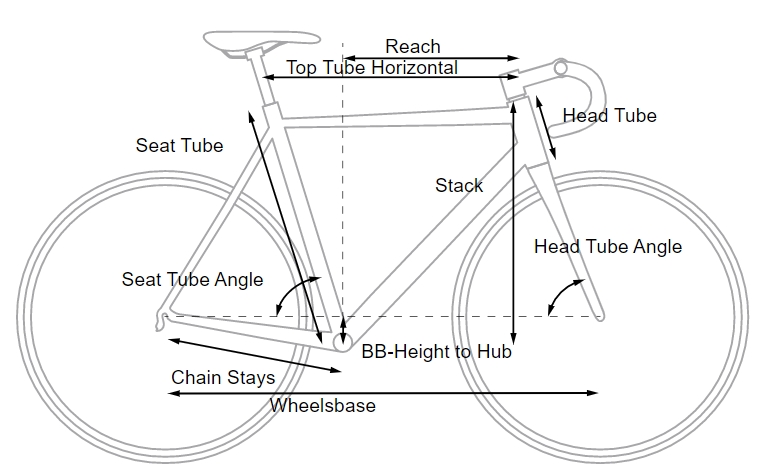
Firstly, it’s helpful to distinguish between geometry for fit and geometry for handling. The geometry measurements for handling include bottom bracket height and drop; wheelbase and chainstay length, trail; stem and handlebar measurements; and seat tube and head tube angles.
Use these measurements to determine whether or not a specific bike will handle like another that you have ridden. Then, you’re ready to find the correct size.
The measurements most pertinent to sizing are stack and reach. However, head tube, seat tube, and top tube length are also relevant and were previously used for sizing before stack and reach became commonplace.
Ideally, you want to choose the size that will require the fewest modifications to achieve the perfect fit, such as adjusting the saddle height. That way, the bike will handle true to its design.
Stack and Reach

Stack and reach are the two most important measurements for determining whether a bike will fit you or not and should be the first point of reference when comparing bicycles. Both dimensions use the center of the bottom bracket as the reference point for taking the measurements.
In short, stack gives you an idea of how tall the bike is, whereas reach indicates the bike’s length. Thus, knowing your personal preference when it comes to the stack and reach allows you to quickly compare different models and sizes.
The benefit of these measurements is the relative simplicity compared to the seat tube and top tube lengths, which are measured differently by manufacturers and are influenced by unusual frame design characteristics.
How to measure reach and stack
Reach measures the horizontal distance between the top of the head tube and the center of the bottom bracket; stack measures a vertical distance to the top of the head tube, both measurements creating a 90-degree angle.
Both measurements are tricky to take, requiring some equipment and possibly an extra set of hands.
To measure reach, place your bike flush against a wall in the corner. Then, measure the horizontal distance from the wall to the center of the bottom bracket, ensuring the line is straight using your bubble level.
Next, repeat the process, measuring from the wall to the center point of the top of the head tube. Finally, subtract the smaller number from the bigger one to get the reach.
Likewise, begin with your bike in the same position when measuring the stack. Measure from the ground to the center of the bottom bracket, ensuring the line is straight with your level tool. Repeat the process, measuring a straight line from the floor to the highest point of the head tube. Subtract the smaller number from the large one to get the stack value.
How to Measure Top Tube Length (TT)
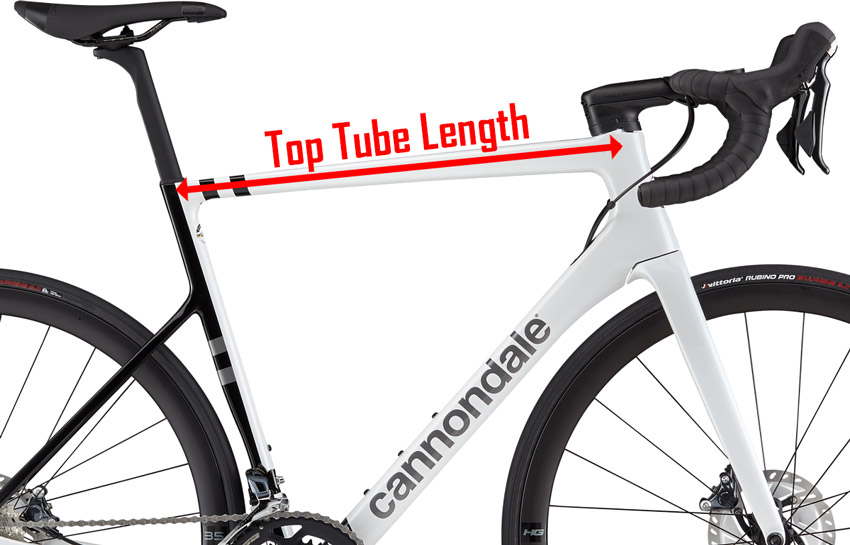
The top tube length roughly determines the distance between the saddle and the handlebars. For horizontal top tubes, TT length is a horizontal line from the center point of the seat tube to the center point of the head tube, and some manufacturers use it for their listed bike sizes.
Sloping top tubes require an extra step involving a long bubble level or a bubble level phone application and a broom handle.
First, take the level or broom handle and run it horizontally from the center point of the head tube to the seat post, check it is level, and mark the position on the seat post. Finally, measure the distance between the mark on the seat post and the center of the head tube using your tape measure. This measurement is the ‘effective’ or ‘virtual’ TT length.
Unfortunately, some manufacturers measure effective top tube length differently, which adds more complexity to an already complex procedure. However, you can circumvent this by looking at stack and reach measurements.
How to Measure Seat Tube Length (ST)
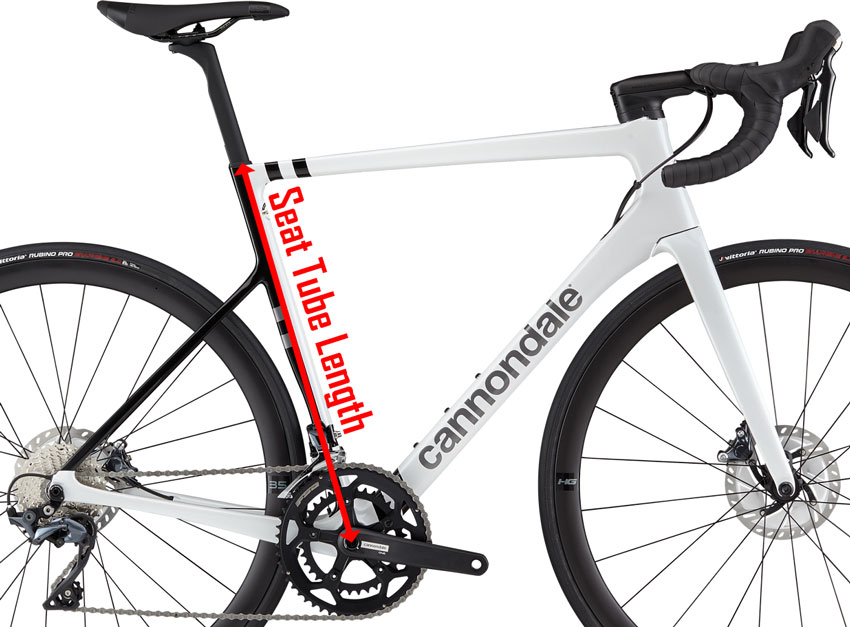
Seat tube length is another fundamental measurement and is more commonly used to dictate a frame’s listed size.
For horizontal top tube bikes, measure ST length by running your tape measure from the center of the crank bolt at the bottom bracket along the seat tube to the top of the seat tube. This is also called C-T (center to top).
Measure from the center of the crank bolt and up along the seat tube for sloping top tubes. But instead, stop at the mark on the seatpost that you made while measuring the top tube length in the previous section.
It’s important to remember that bike frames vary hugely, making it harder to compare different models using this measurement. For example, if a bike has a characteristic such as a raised or kinked seat tube, it will be harder to compare it to others using seat post length.
Secondary Bike Frame Measurements
If you’re interested in diving further into bike dimensions and bike geometry, this section will describe the key measurements to determine how the bike will ride.
How to Measure Head Tube Length (HT)
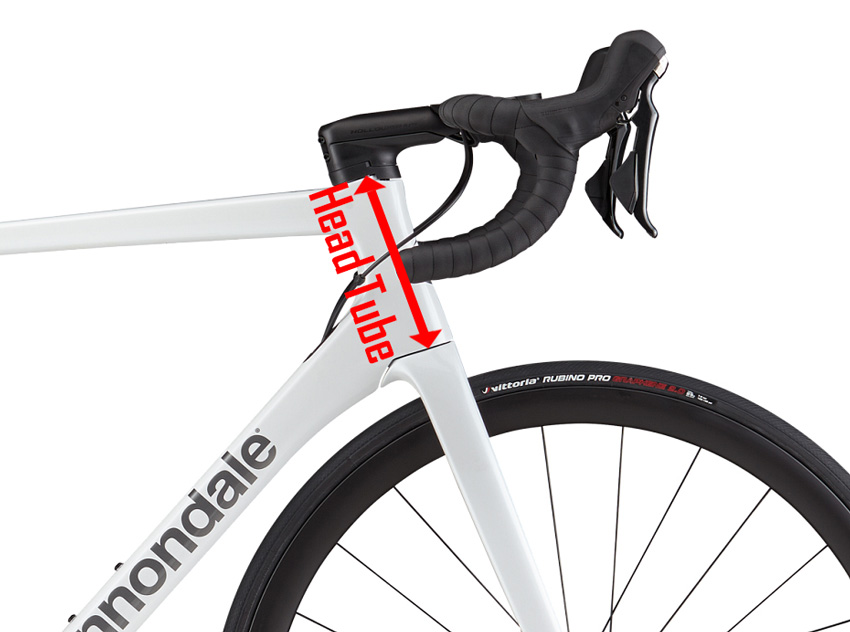
The HT length is the most straightforward measurement. While the length changes with frame size, the relative length greatly influences rider position. For example, a long HT puts the rider in a more relaxed, upright riding position, typical of endurance road bikes or gravel bikes. Conversely, a short headtube results in a more aggressive, aerodynamic position.
Use your ruler to measure from the bottom of the tube where the fork enters the frame to the top where the headset attaches. This number is your head tube length.
How to Measure Seat Tube and Head Tube Angles
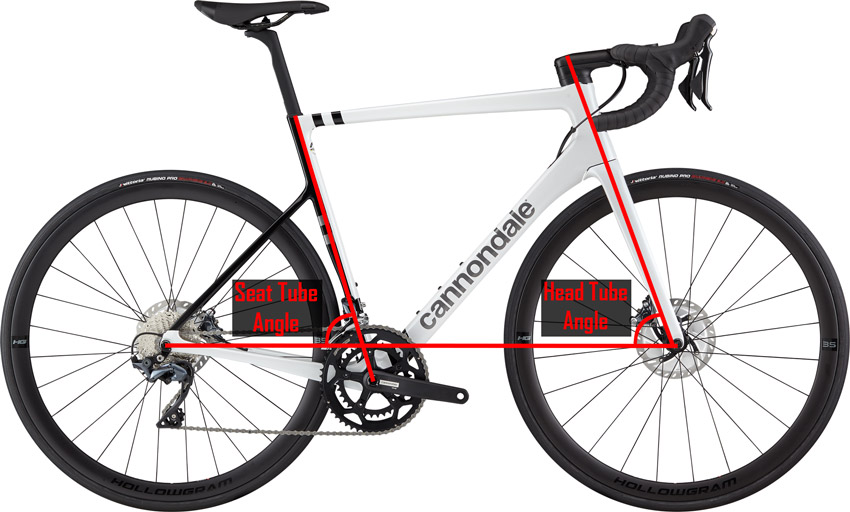
The seat and head tube angles are pivotal in determining how a bike handles. They are commonly referred to as ‘steep’ or ‘slack.’ Both measurements use the ground as the reference point, a steep angle being more open and a slack angle being slightly more closed. Only slight adjustments to these angles (1-2 degrees) can have surprisingly large effects on handling.
A steep head angle creates sensitive, agile handling and has a fast feel, as seen on road and TT bikes. On the other hand, MTB and gravel bikes have slacker head angles to create stability, which requires more effort to steer but is better for rough or technical riding.
Seat tube angle has a less pronounced effect on handling than HT angle and doesn’t vary as much. However, it also impacts how the bike fits. A steep seat tube allows the rider to get into a more aggressive position, typical of an aero road or triathlon bike.
Conversely, a slack seat tube angle puts the rider’s weight further back and slightly increases control, benefitting mountain biking. Additionally, a slack seat tube results in a saddle position set farther back behind the bottom bracket, possibly requiring significant adjustments to its position to achieve the correct fit, so keep an eye out for variances in this measurement.
You can use the Clinometer application on your cell phone and line it up at the midline of your seat post and head post to measure these angles. First, however, ensure your bike is standing on a level surface with both tires inflated to get an accurate reading.
Some head tubes are tapered, so you must measure the angle in its center, as the external angles will vary. Likewise, seat tubes can have design variances, so measure the centerline of the seat tube.
How to Measure Wheelbase (WB) and Chainstay Length (C)

The wheelbase of a bike is the horizontal distance between both wheel axles. By learning how to measure the wheelbase, you will get a good indication of how a bike will handle. A long wheelbase makes the bike more stable but creates a bigger turning radius; a shorter wheelbase makes a bicycle more agile, easier to turn, and fast-handling.
How is wheelbase measured?—it involves taking your measuring tool and running a straight line between both axles, ensuring the front wheel is pointing straight ahead. Then, to double-check you have an accurate number, measure the other side of the bike and take the average of both numbers (if there is a difference).
Chainstay length has similar effects to the wheelbase, short for agility; long for stability. Additionally, a shorter chainstay can impact the stiffness of a frame, making the bike more responsive.
Even minor chainstay length modifications can make an enormous difference to the handling. Using your ruler, measure a straight line between the center of the crank bolt and the rear dropout center point; this is your chainstay length.
Front Center
The front center is related to the wheelbase but measures the horizontal distance between the center of the bottom bracket and the front wheel’s axle. This number has a minimal effect on handling but will tell you how much toe overlap the frame has.
Trail
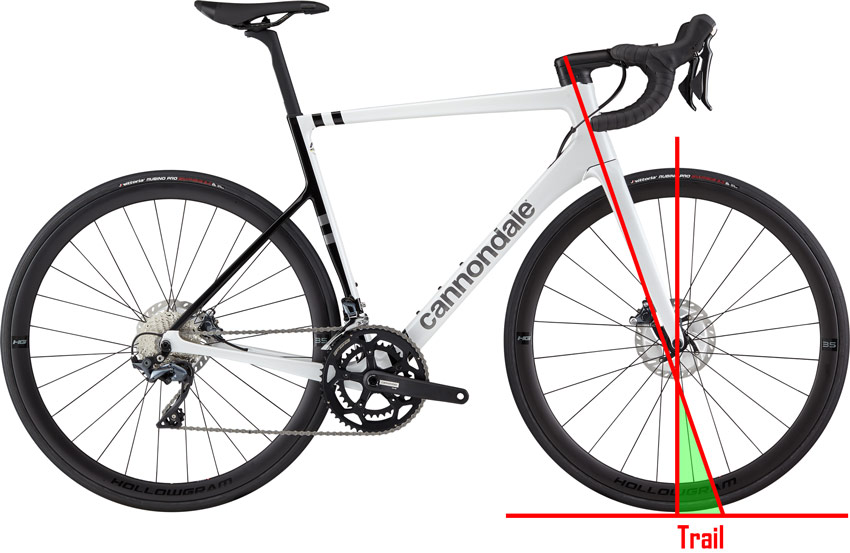
Trail refers to the distance between the contact point of the tire and the steering axis. It is a product of the head angle and fork offset. This measurement is pretty tricky to visualize but can be helpful for the riders looking to find the perfect bike for competitive riding.
More trail creates a stable feel at high speeds and on technical tracks but makes it harder to ride out of the saddle on a road bike. Less trail makes a bike feel fast and creates twitchy handling characteristics. A performance-optimized road bicycle will have a steep head angle and high fork offset (less trail).
How to Measure Bottom Bracket (BB) Height and Drop
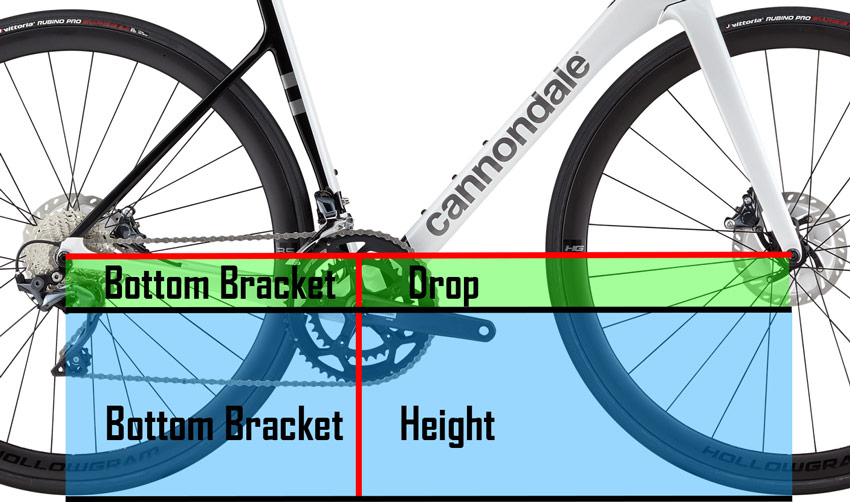
The center of the bottom bracket is the most crucial reference point for measuring bike geometry. As such, bottom bracket height influences most other measurements.
A low bottom bracket creates stability as your center of gravity is lower, but it also means the pedals are closer to the floor, so you must be aware of that when cornering.
Measure the BB height by running a vertical line from the center of the crank bolt to the floor, ensuring your bike is standing straight and the wheels are inflated equally.
Bottom bracket drop describes how far the center of the bottom bracket sits below wheel axles, the more important of the two BB measurements. More BB drop improves a bike’s corning ability, making it easier to lean due to the lower center of gravity. On the other hand, less BB drop makes a bike more stable at high speeds but reduces the cornering ability and makes the steering less sensitive.
You can find BB drop by measuring the distance from the center of either wheel axle to the floor. Then, subtract the bottom bracket height from this number.
Stem Length
Stem length can drastically change handling. For example, a longer stem makes steering less sensitive and puts the rider forward and down into a more aero position; a shorter stem will create a more upright position and make a bike more sensitive to steer.
In an ideal world, the stock stem length is best as a bike’s geometry and handling are designed for a specific stem, meaning a change can negatively impact ride quality. However, if you purchase a second-hand bike that is slightly too small, you could change the stem to create a more comfortable ride position.
How to Choose the Right Size Bike
Trek Madone size chart — How not to get lost in the numbers?
Again, if you can find out the reach and stack for a bike you like or that you had fitted in the past, you will be in a great position to start looking for a new one.
Let’s say that your preferred reach is 380mm and the stack is 580mm; you can cross-reference bikes in your price range to determine which ones are suitable. Then, the ideal situation would be to do a test ride on the bikes you identify.
You could compare the following endurance road bike frames, for example:
- Cannondale Synapse Carbon 4, Size 56: Reach – 590mm / Stack – 387mm
- Orbea Orca, Size 54: Reach – 579mm / Stack – 388mm
- Cervelo Caledonia, Size 56: Reach – 580mm / Stack – 387mm
Keep in mind not to trust the manufacturer’s bike size chart with size classes such as x-small, small, medium, large, x-large, etc. Two medium-sized bikes from different brands could fit you completely differently.
How to Choose the Correct Bike Size Quickly?
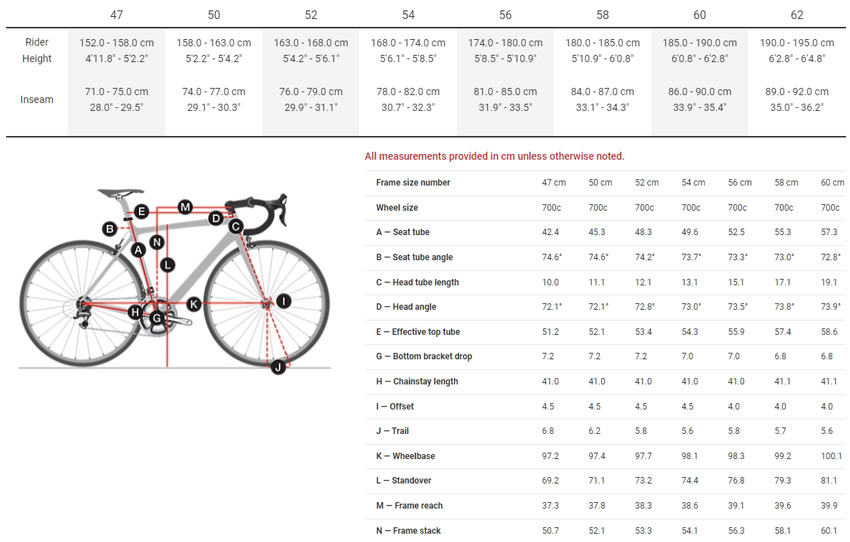
To choose the correct bike size quickly, reference the manufacturer’s geometry charts and pick the bike frame size corresponding to the rider height (from the floor to the top of your head). Some manufacturers match bike size with inseam length, which you can measure at home. Simply measure from the floor to the top of your crotch to find this number.
Additionally, it’s helpful to know what to do if you’re between sizes. Also consider using an online bike size calculator, which can quickly recommend the right size.
Read Next
Share this on:


much too complicated for the average person just wanting to buy a bike. What would help is a table that shows a person’s height and comparing it to the frame size to determine degree of comfort.
Hi Juan, please check our sizing guides below to find the right bike size based on your height:
– Bike Size Charts
– Road Bike Size Chart
– Mountain Bike Size Chart
The difference between Indurain, LeMond, etc. and the modern guys is that Indurain’s ear was on or behind a line drawn up through the head tube resulting in the bike going in a straight line even when the rider is fatigued.
Modern riders are fit in wind tunnels and their ears are up to 7″ in front of this line making the bike impossible to ride in a line. Many of the crashes you see and the need for helmets is due to the skull being far from the balance point of the bike.
Sensible, efficient, well written article!
Thanks!