Bike Geometry Guide — Understanding Bicycle Geometry
Bike Insights & Bike Dimensions
When researching different bike models, you will probably come across the term bike geometry a few times. Understanding what it means will help you choose a bike that feels best for your style of riding.
What exactly is Bike Geometry?
We all know what geometry means when referring to mathematical concepts of space, so what exactly are people talking about when they refer to the geometry of a bike?
For a long time, frame builders have used a loose set of concepts and wisdom for making all kinds of bikes that ride well. Put simply, bike geometry is the collective measurements of all the individual pieces that make up a bicycle.
These measurements will have an impact on how the bike handles in different situations, and how it feels to ride. A change in frame geo can make the bike more suited to casual riding, racing, riding down hills, and a whole host of other specializations.
Luckily, most brands do a good job of marketing their bikes to the correct audience. Still, it is helpful to understand the basics of frame geometry. This will help you make the best decision when buying a bike. Getting familiarized with different parts of a standard bike frame is a great place to start.
- Learn more: How to Measure a Bike Frame
Contents
- Parts of the bike frame
- Stack & Reach
- Head tube/Seat tube angle
- Wheelbase
- Fork considerations: Rake & Trail
- Widths & Diameters
- Other factors
1. Parts of a Bike Frame
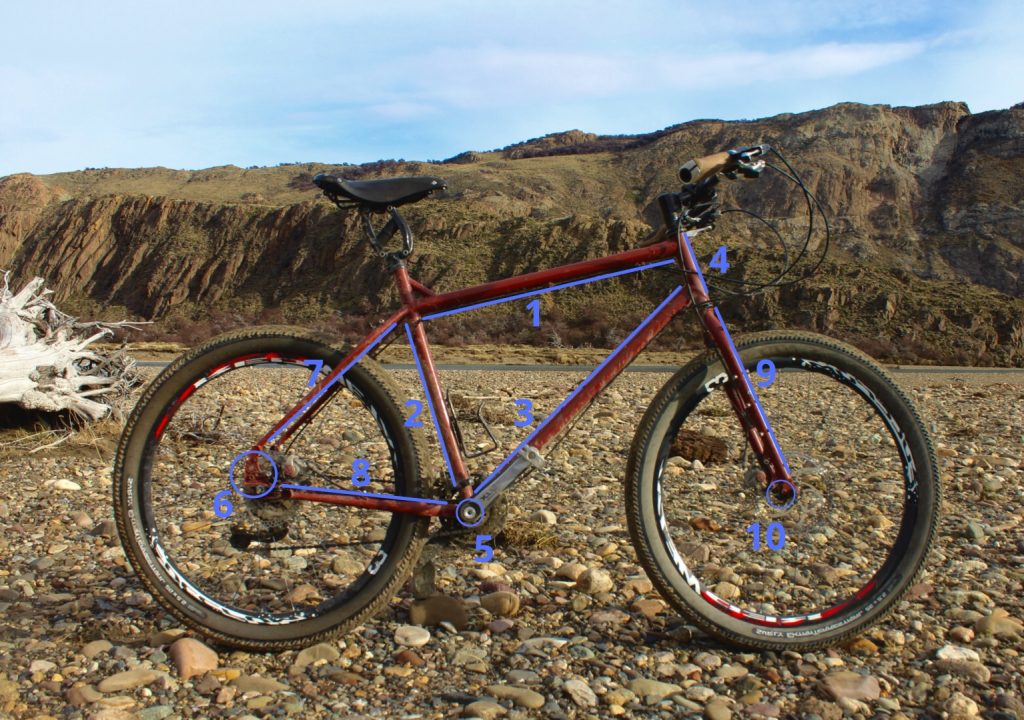
It’s useful to understand all the parts that comprise a standard double triangle bike frame. Let’s take a look before we dive deeper into geometry concepts.
- Top Tube – The bar that runs across the top of the main triangle, between where the seatpost and handlebars are located.
- Seat Tube – The vertical bar at the back of the main triangle, between the saddle and bottom bracket.
- Down Tube – The bar that runs across the bottom of the main triangle, behind the front wheel.
- Head Tube – The large diameter vertical bar at the front of the main triangle, where the fork is inserted.
- Bottom Bracket Shell – The hole at the bottom of the seat tube where a bottom bracket and cranks are installed.
- Rear Dropouts – The junction at the back of the rear triangle where the rear wheel axle and rear derailleur are secured to the bike.
- Seat Stays – The metal tubing that runs across the top of the rear triangle, between the seatpost and rear dropouts.
- Chain Stays – The metal tubing that runs across the bottom of the rear triangle, between the bottom bracket and rear dropouts.
- Fork – The two-pronged piece that holds the front wheel and threads into the frame through the head tube.
- Front Dropouts – The connection at the bottom of the fork where the front skewer/axle is inserted.
2. Stack & Reach
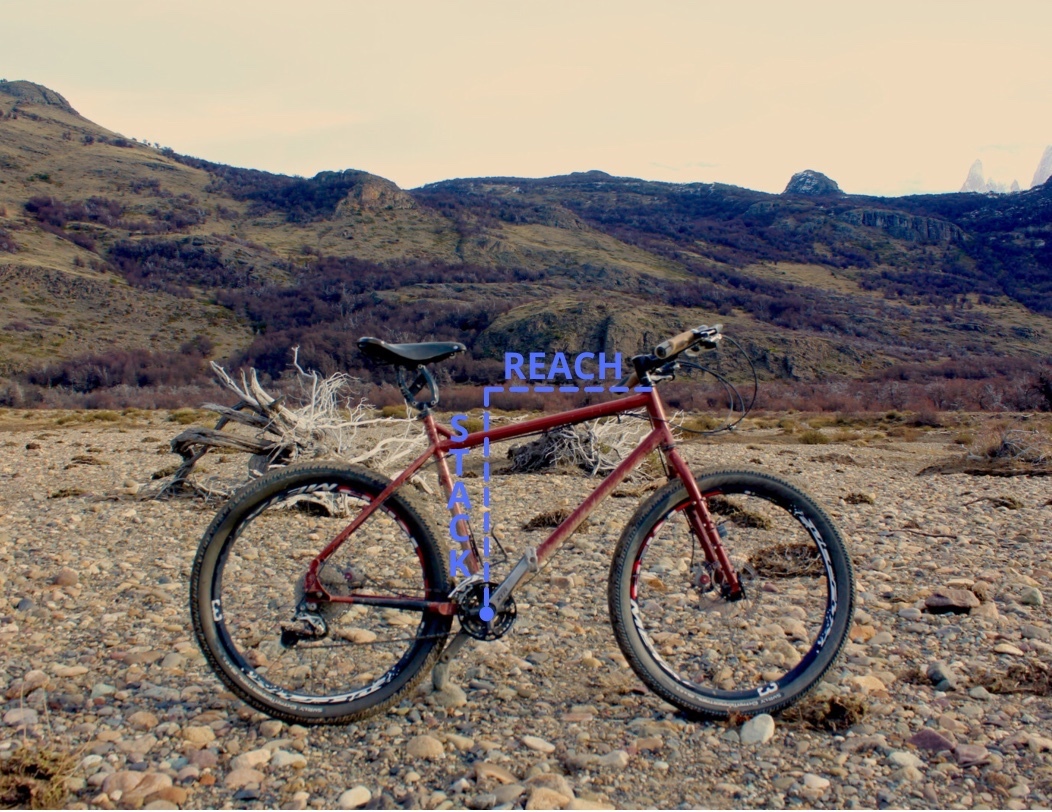
Let’s refer to the chart above for a second, and look at the position of the bottom bracket shell as well as the head tube. Stack and reach both refer to the distance between the center of the bottom bracket shell and the top of the head tube. Stack is the vertical height between these two points, and reach is the horizontal distance between them.
A larger stack will put you in a more upright riding position. The relation between the height of where your feet sit on the pedals and where your hands rest on the handlebars increases with more stack. Greater stack generally feels more relaxed since you are less hunched over.
A larger reach will increase the horizontal distance between your feet at the pedals and your hands on the bars. Frames with long reach put you in a more forward riding position, which helps cut down wind resistance and results in a faster ride.
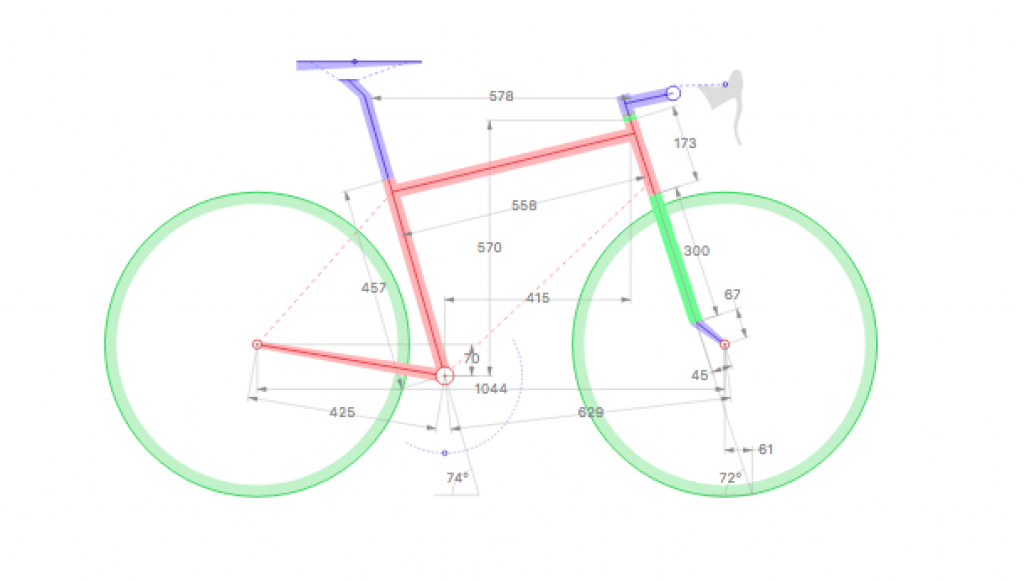
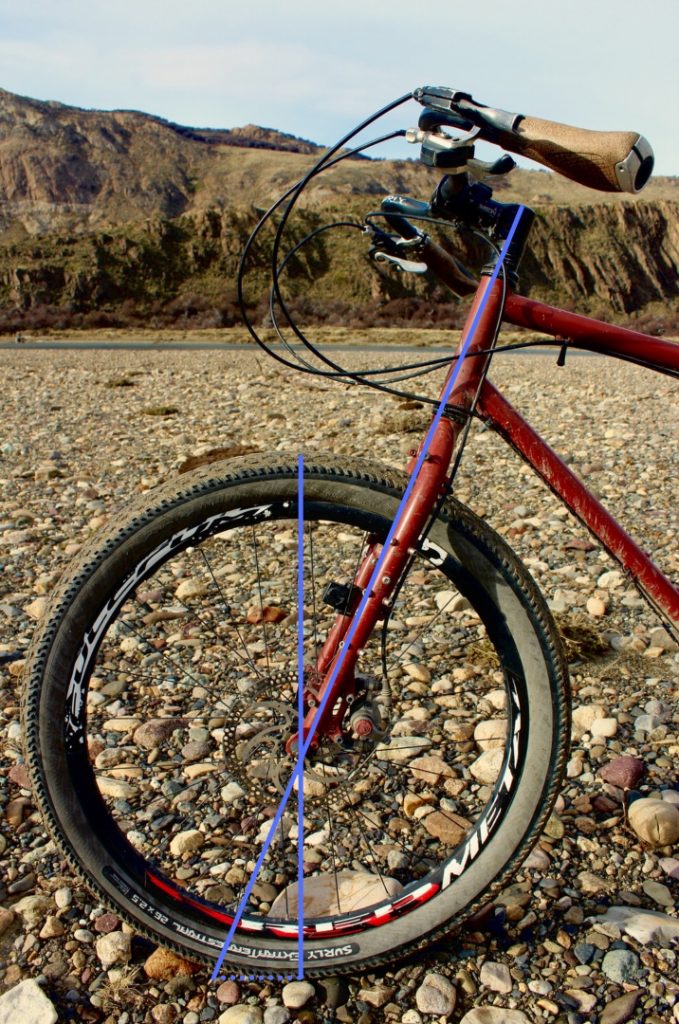
3. Head Tube / Seat Tube Angle
Another factor that can greatly impact the way a bike handles is the angle of the seat tube and head tube relative to ground. These two angles are independent of each other, and changing either will have different effects.
The head tube angle directly impacts the angle at which the fork fits into your bike. A smaller head tube angle will result in the fork tilting back further and the front wheel coming out further in front of you. Mountain bikes (especially those with soft forks) tend to have smaller head tube angles in order to give more suspension clearance and achieve a wider wheelbase. Road bikes tend to have slightly larger head tube angles. Head tube also effects where your fork steerer ends up.
The seat tube angle changes where the saddle sits in relation to the bottom bracket. A small seat tube angle means the saddle will be set further back, and more of your weight will rest on the saddle as you ride. Large seat tube angles (those approaching 90 degrees) are often used in trials frames because they allow riders to sit hunched over for greater aerodynamics.
4. Wheelbase
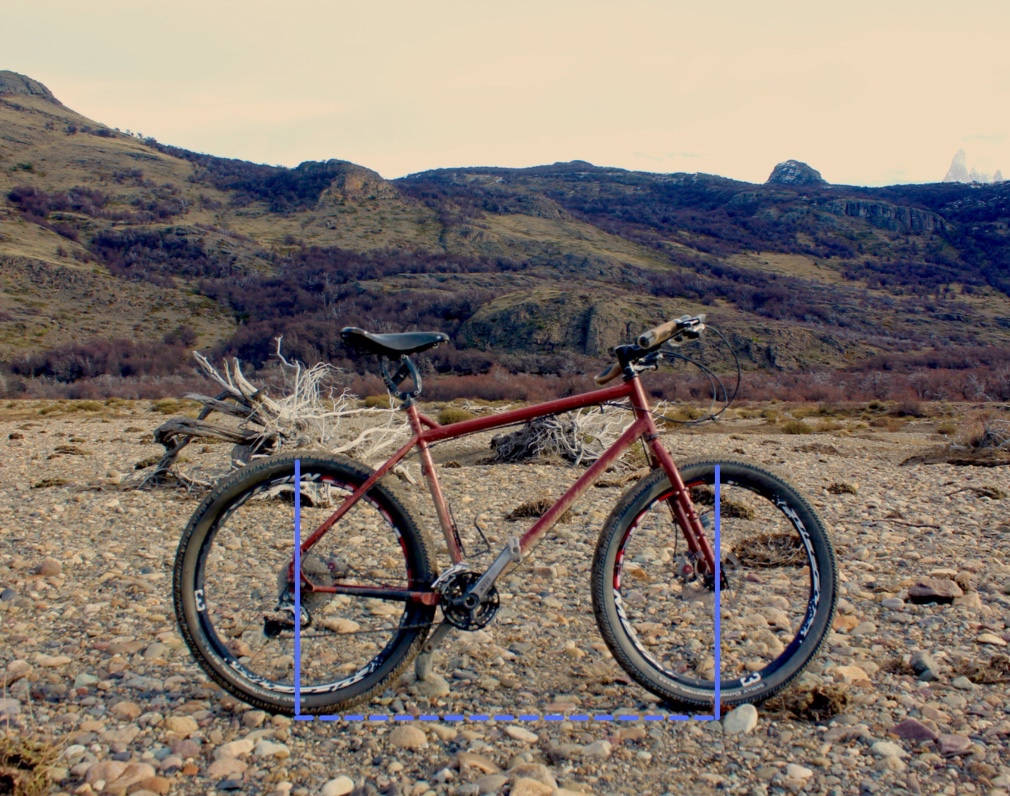
The wheelbase is the measurement between where the front and rear wheel make contact with the ground. It can be influenced by several different factors like the length of the chain stays, the head tube angle, and fork offset.
Long wheelbases make for steady bikes that turn more slowly. Short wheelbases make for faster steering and less stability, especially on downhills. If you are looking for a bike for touring, casual commuting, or cargo carrying, you will want to choose a bike with a longer wheelbase. If you are looking for a racier, more playful bike then a shorter wheelbase would be a good choice.
5. Fork Considerations: Rake & Trail
Now that we’ve covered some of the main aspects of frame geometry, lets take a look at forks. Forks have a big impact on the handling of a bicycle, especially on steering. We’ll examine two measurements in specific: fork rake and trail.
Fork rake (or fork offset) refers to the distance between the front hub and the imaginary steering axis coming down from the head tube. Some forks are curved forward near the bottom, others have a slight angle at the junction where the steering tube meets the fork crown, and some have forward facing dropouts that move the axle (and hub) forward. These are just different ways of offsetting the hub in relation to the steering axis. A larger fork rake (further offset towards the front) makes the steering faster. Inversely, a smaller fork rake makes steering slower but results in more stability.
Trail is a slightly more complex measurement that is directly influenced by fork offset as well as head tube angle. If we extend the imaginary steering axis all the way to the ground, and extend another imaginary line vertically from the front hub to the ground, the difference between the two points is the trail. Forks with more rake will have less trail. A larger trail will result in a bike that “self corrects” more as you steer, thus providing better handling at high speeds.
6. Widths & Diameters
![]()
Another important consideration, especially when buying replacement parts, is matching components with various standards in widths and diameters on the frame. Please refer to the chart below.
- Bottom Bracket Shell Width – The width of the bottom bracket shell comes in many different standards, as well as threaded and press-fit versions.
- Front Hub Spacing – Not all wheels feature the same hub shell width! An MTB hub with boost spacing will not fit on a track fork. Be aware that thru-axle forks need special hubs and axles as well.
- Rear Hub Spacing – The same as the front hub, the rear hub needs to be matched to the width of the rear dropouts.
- Headset – Modern bikes come with a variety of headset standards. Some headsets are the same diameter top and bottom, others feature different widths in order to accommodate tapered steering tubes.
- Seatpost – Make sure you check your seatpost diameter before buying a replacement, as they come in many sizes.
7. Other Factors
Beyond the frame, there are many other factors that will impact the way a bike handles. Think of the frame as a base, from which many possible outcomes can be achieved. If you find your bike to be uncomfortable or otherwise ill-suited to your needs, the easiest and cheapest way to fix it may be changing up some of the smaller components. This is a great way to augment the bike’s effective geometry without swapping frames.
Try experimenting with different length stems, alternative handlebar designs, offset seatposts, different forks, different saddles, wider and skinnier tires etc. Even adjusting your seatpost height or saddle angle can greatly improve the way your bike feels. Bicycles provide the base for an incredible amount of modification, and only through experimentation is it possible to truly dial in your setup.
That said, a size small frame will never be the right fit for and extra-large rider. Nothing can beat the feel of a properly fitting frame.
Read Next
Bike Size Charts: How to Choose the Right Bicycle Size
Share this on:

On the page where you describe bike sizes (bike-size-charts), you refer to the “Bike Frame Size”, but nowhere on that page or this one (bicycle-geometry-101) do you explain where the “Bike Size” is measured on a frame.