How to Shift Gears on a Bike: Gear Shifting Explained for Beginners
Learning how to shift gears effectively will increase the enjoyment of your rides and help boost your endurance.
Effective shifting allows you to maintain a steady pedaling rhythm, save energy, and become faster. In addition, you can avoid getting stuck in a high gear at a traffic light or at the beginning of a climb, for example.
Maintaining a consistent pedaling rhythm involves anticipating changes in the road or trail ahead, getting accustomed to your bicycle gear shifter and drivetrain, and lots of practice.
This guide will give you the information you need to begin shifting like a pro so that you can get the most out of your bike rides.
Why Do Bikes Have Gears?
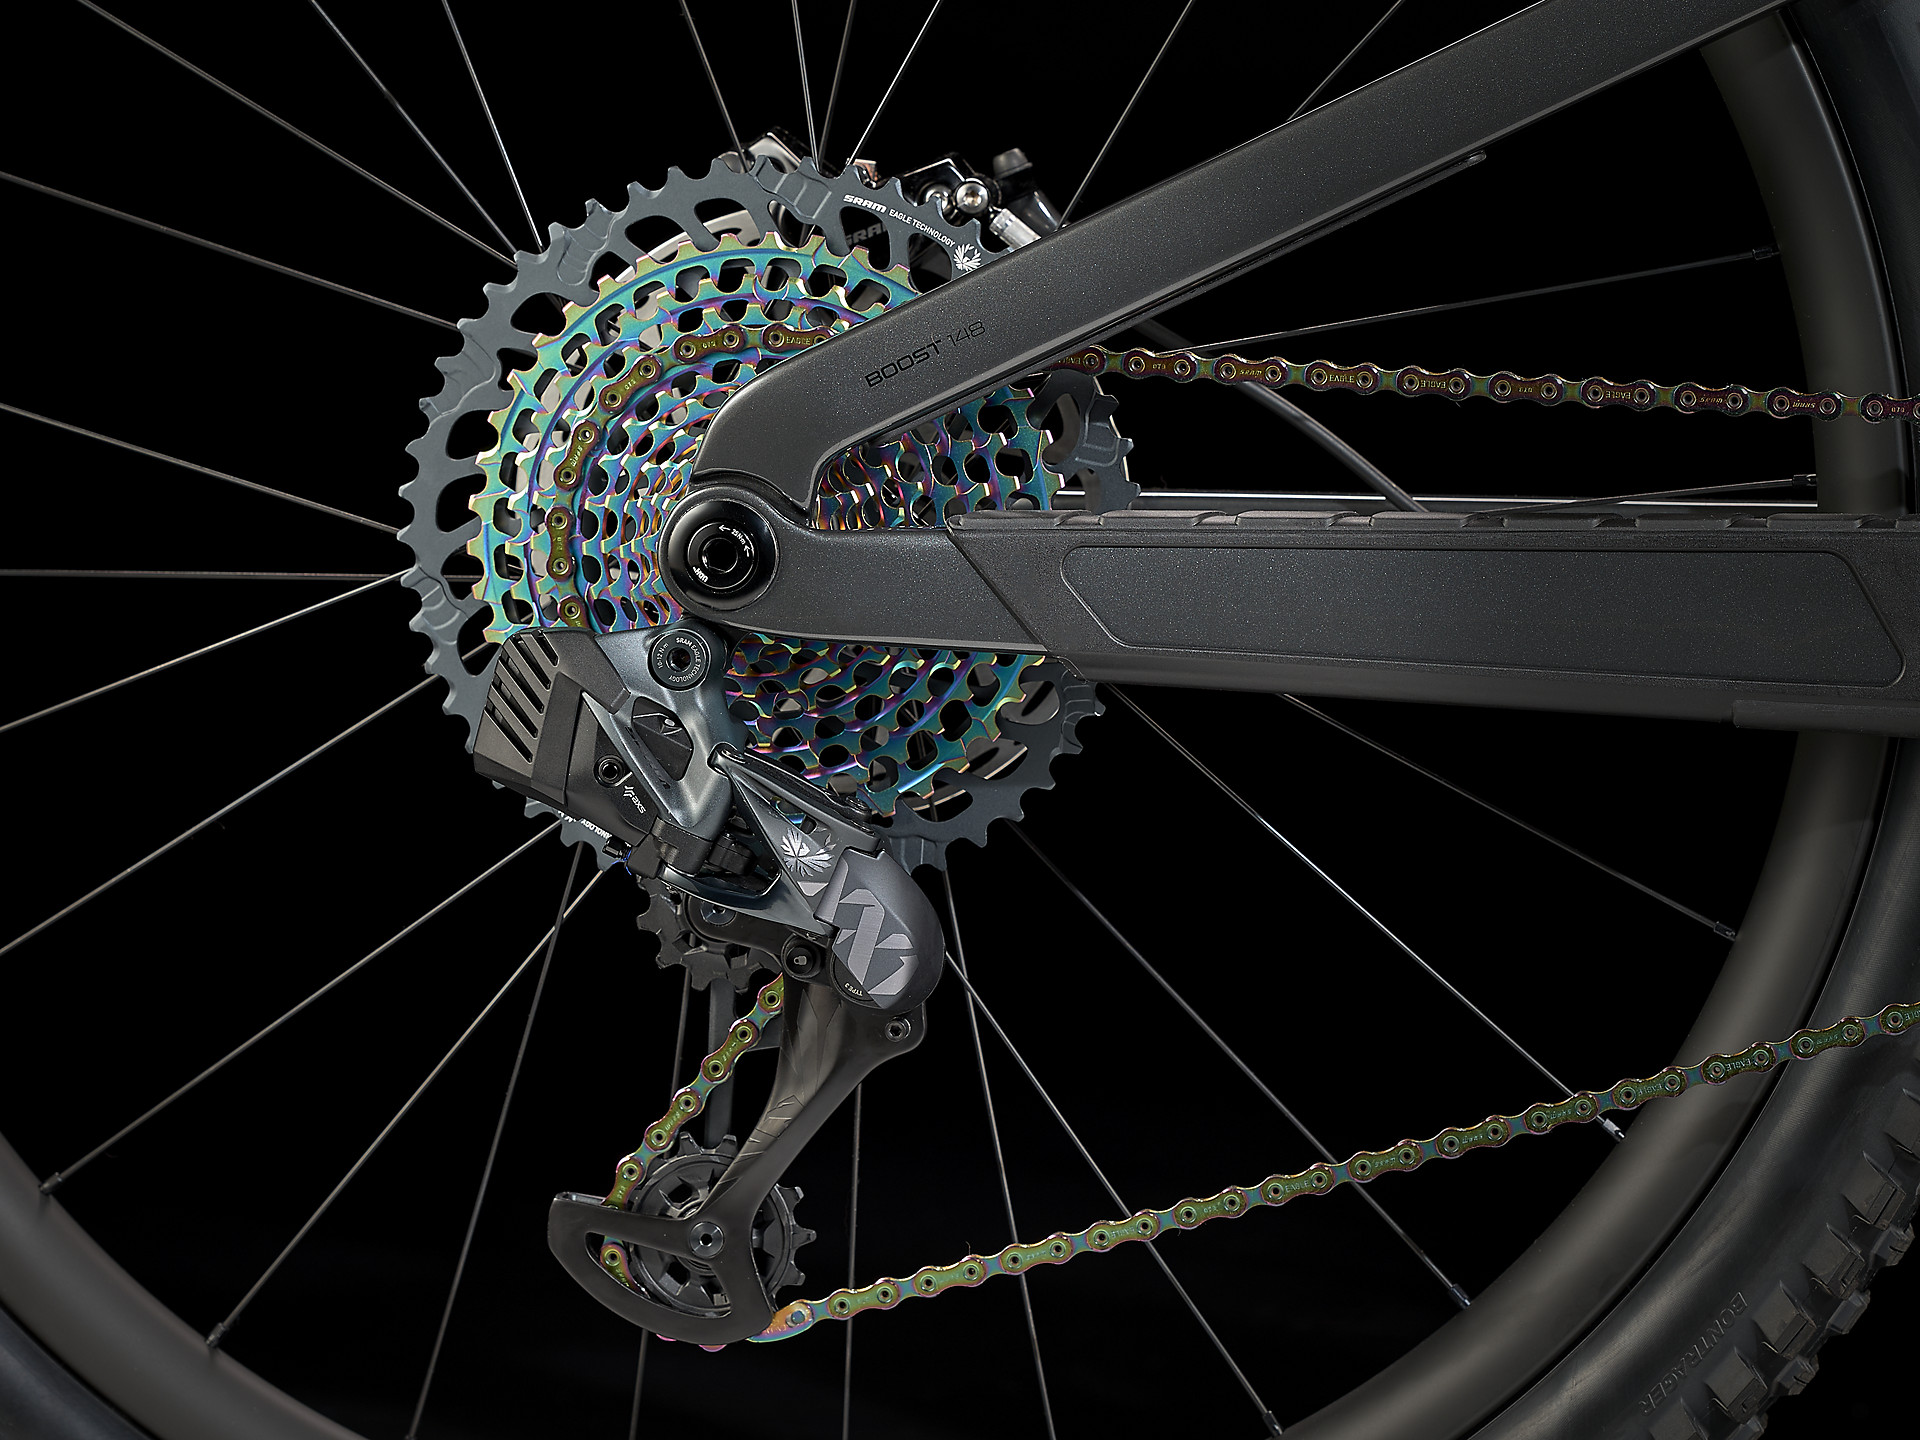
Image source: Trekbikes.com
Bike gears are all about efficiency. A wide range of gears allows riders to pedal at a consistent cadence while riding on varied gradients, terrains, and in windy conditions.
With a range of gears to choose from, you can climb or descend steep gradients and ride with or against strong winds, which would be extremely difficult or impossible on a single-speed bike. Additionally, the steadier your cadence, the less energy you expend, allowing you to ride longer without tiring.
Without gears, your cadence would drop significantly each time you began climbing a steep hill. In this situation, you could continue cycling seated or ride out of the saddle, both requiring vastly more energy per pedal stroke.
Conversely, to ride fast downhill or with a tailwind without gears would require an extremely high cadence, causing you to bounce on the saddle and possibly lose control.
When Should You Shift Gears?
It’s essential to change gears often to help save energy and increase endurance. By shifting at the correct time, you can maintain a smooth pedal stroke and consistent tempo, slowing the accumulation of fatigue.
Ideally, hold a cadence that works for you around 80-100rpm. But, of course, the exact tempo you prefer varies from person to person; some prefer higher, some lower.
The best time to shift is just before any change to the road/trail ahead that will cause you to increase or reduce your speed. Specifically, avoiding sudden drops in cadence will help reduce fatigue.
- Changes in gradient – Use the left-hand shifter for big changes and the right-hand shifter for slight ones. Shift to a higher gear to go downhill and a lower gear to go uphill.
- Sharp corners – If you must slow down considerably before cornering, shift to a lower gear so it is easier to accelerate again when you are clear.
- Traffic stops – If you are approaching a stop sign, yield sign, or traffic light, shift to an easier gear so you can accelerate smoothly when necessary.
- To ride out of the saddle – Shift up one or two gears higher to maintain a steady cadence when you want to ride standing up.
How to Shift Gears on Different Types of Bikes
There are various groupsets, shifting systems and drivetrain setups, each with slight differences. This section will cover the most popular ones: road, twist, and trigger shifters.
Before reading further, remember that the left hand shifters operate the front derailleur (chainrings) and the right hand shifters control the rear derailleur (cassette).
However, electronic drivetrains, compared to mechanical ones, work slightly differently, requiring you to push the levers much less.
Integrated Road-Style Shifters

Shimano Ultegra STI road bike shift levers.
Bikes with drop handlebars, such as road bikes, gravel bikes, and cyclocross bikes typically use integrated brake and shift levers. The tops are used to rest your hands while riding, which is a comfortable position for long-distance riding.
The brake levers are pulled backward to engage the brakes but have a dual function. Besides braking, you can also push these levers inside to shift gears. This design allows for quick and easy gear changes without moving your hands from the braking position.
There’s also an additional pair of shifters behind the brake levers that you operate with your fingers while your hands are on the brake levers. The two pairs of shifters control front and rear derailleurs in each direction (shifting up and down).
Here’s a breakdown of how they work on each side:
Left side controls the front derailleur
- Left big lever: push for a harder gear, to upshift the chain to the big ring
- Left small lever: easier gear, moves the chain to the smaller chainring
Right side controls the rear derailleur
- Right big lever: push the right big lever to move the chain to an easier gear/larger cog.
- Right small lever: push in to shift to a harder gear/smaller cog.
Twist Shifters

Shimano Revoshift — the system most of us used to learn about bike gears.
This system is more intuitive than the road bike shifters described above and is used on many cheap off-road bikes and urban bikes. Popular twist-operated shifters include Shimano’s RevoShift and SRAM’s Grip Shifters.
Here’s a breakdown of how they work:
Left side controls the front gears
- Twist forward = easier gear, small chainring
- Twist back = harder gear, big chainring
Right side controls the rear gears
- Twist forward = harder gear, smaller cog
- Twist back = easier gear, bigger cog
Trigger Shifters

Shimano XTR Trigger Shifters used on most mountain bikes.
Trigger shifters such as Shimano RapidFire and SRAM Trigger Shifters operate similarly. For Shimano, each side has two triggers, one for the thumb and another for the index finger. SRAM has two thumb triggers on either side, a small lever in front of a larger one. This system is most popular on mountain bikes and hybrid bikes.
Here’s a breakdown of how they work:
Left shifter operates the front derailleur
- Left index-finger trigger = easier gear, smaller chainring
- Left thumb trigger = harder gear, bigger chainring
Right shifter operates the rear derailleur
- Right index-finger trigger = harder gear, smaller cog
- Right thumb trigger = harder gear, bigger cog
Bike Gear Shifting Basics
It’s helpful to understand some common terminology and how the components work to help get the most out of your gears. This section will touch on each of the relevant terms and parts for shifting.
- Higher or harder gear = the small cogs on the cassette and big chainring(s)
- Lower or easier gear = the bigger cogs on the cassette, smaller chainring(s)
*Note: many cyclists refer to high gears as ‘big gears’ and low gears as ‘smaller gears.’
Bike Cassette

The cassette is a series of cogs at the center of the rear wheel, descending outwards from big to small. The large cog on the cassette is the lowest/easiest to pedal; the smaller the cog, the higher the gear and the harder it is to pedal.
Cassettes contain a series of cogs up to a max of 13, each with a specified number of teeth (represented using a lowercase t, 11-28t).
The relationship between cog and chainring teeth determines the gear ratios. The more rear gears there are, the smaller the jump between gear changes; smaller increments allow riders to maintain a smoother, more efficient pedal stroke.
To achieve the hardest gear, move the chain to the smallest rear gear and the largest front sprocket, and vice versa for the easiest gear.
Bike Chainrings — 1x, 2x, 3x

Chainrings (sprockets) are the larger plates at the front of the drivetrain attached to the cranks. The chainrings oppose the rear gears, meaning the bigger the chainring, the higher the gear and the more effort it takes to pedal. Conversely, the smaller chainring(s) is easier to pedal.
Again, having more chainrings decreases the gap between each gear and provides a broader gear range, allowing riders to find the correct cadence when tackling very steep gradients. That said, most manufacturers try to minimize the number of chainrings to save weight and reduce drivetrain complexity for easier adjustments and repairs.
Gear Ranges and Ratios
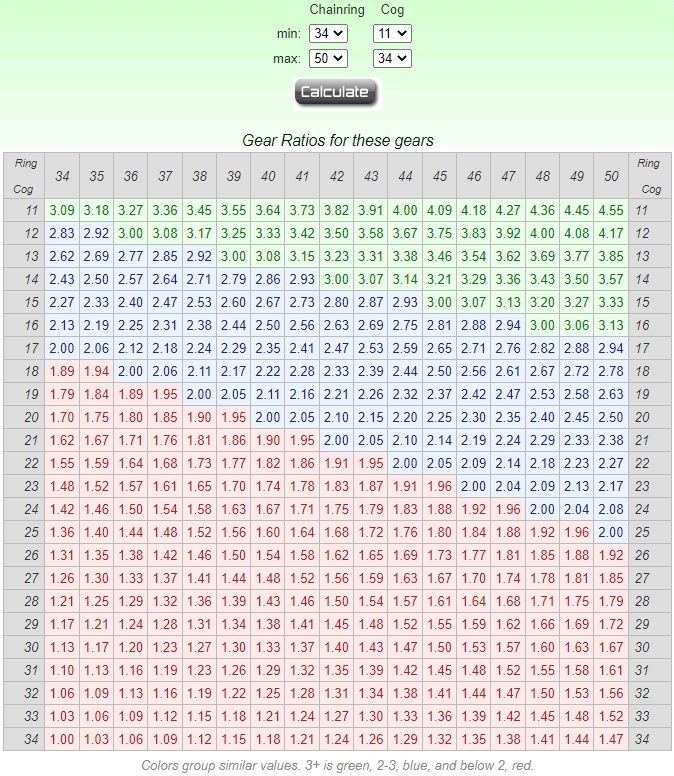
Gear ratios provided by a common 50/34t – 11-34t road bike drivetrain. | Image source: bikecalc.com screenshot
A gear range includes the number of gears and the distance between the highest and lowest. An extensive gear range is essential on climbing bikes or downhill bikes. For example, most mountain bikes have a wide gear range set lower to facilitate climbing, whereas performance road bikes have wide ranges with more high gears to facilitate high-speed riding.
Gear ratio refers to the relationship between the number of teeth on the front chainring and the rear cog. You want small gear ratios for the easy gears and bigger ratios for harder ones.
For example, a 34t front chainring paired with a 32t rear cog is smaller (1.06:1) than a 34-28t (1.21:1) combination making it better for climbing. Conversely, a 50-10t pairing provides a larger gear ratio (5:1) than a 50-12t cog (4.16:1), making the 50-10t better for descending and riding at high speeds.
Front Derailleur and Shifter

The left-hand shifter connects to the front derailleur with a cable (or wirelessly) allowing you to shift your chain between the chainrings at the front of the drivetrain.
Switching between chainrings causes the most noticeable jump in gear and is typically done just before you lose or gain a lot of speed, for example, before reaching a steep gradient. So, shift to the big chainring when you’re about to descend and shift to the small chainring when you’re about to begin climbing.
Rear Derailleur and Shifter

The right-hand bike shifter operates the rear derailleur, moving the chain between cogs on the cassette. In addition, this derailleur tensions the chain when you switch between gears. Most gear changes are done using just the cassette cogs in response to slight fluctuations in gradient or conditions.
Why Is Cross Chaining Bad?
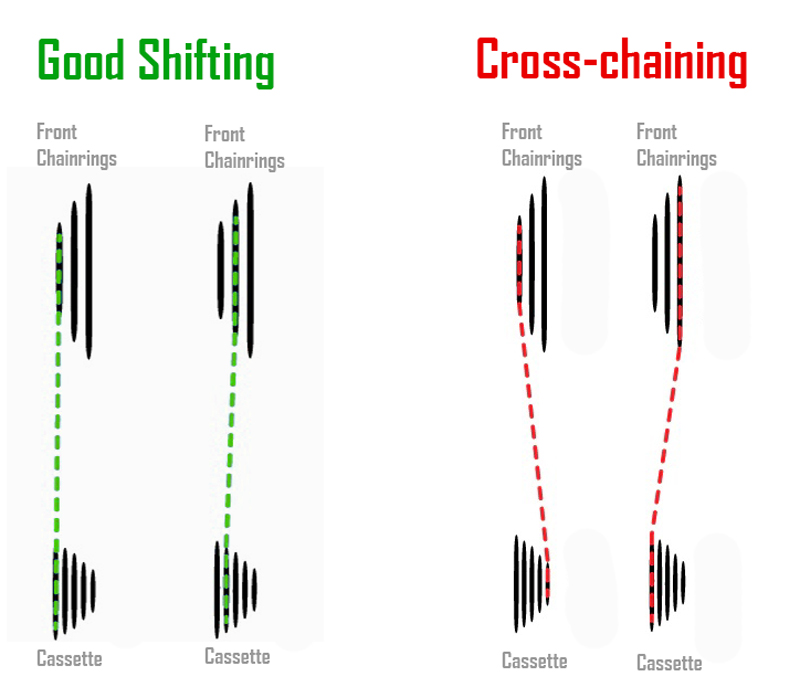
A crossed chain puts significant stress on the drivetrain, causing more rapid deterioration of the cogs, chain, and chainrings. In addition, this misalignment slightly reduces drivetrain efficiency, requiring you to work harder to achieve the same output.
Cross-chaining happens when you use the gears at the far end of the gear range, causing the chain to run diagonally between the chainring and cog. This angle is most extreme when using the big chainring with the biggest cog or using the small chainring with the smallest cog.
Cross-chaining will also cause more chain wear, requiring you to replace the chain more frequently.
Tips for Proper Shifting
You can implement a few shifting tips to improve your technique quickly. As mentioned before, smooth, anticipatory shifting helps you maintain a steady pedaling and save valuable energy.
1. Use the Highest Cadence That Feels Comfortable
When riding seated, try to maintain the highest cadence you can without bobbing around on the seat. For some riders, this will be 80rpm; for others, it may be as high as 100rpm. Maintaining a high pedaling rpm ensures efficient energy use, boosting your overall endurance and cycling performance.
2. Anticipate the Road/Trail Ahead
The most critical part of effective shifting is watching the road ahead for changes. As described in a previous section, shift before any change that will cause you to slow down or speed up, including corners, traffic stops, and gradient changes. Doing this allows you to maintain a consistent cadence and avoid wasting valuable energy.
3. Shift Up or Down the Cassette Before Switching Chainrings
Moving up or down the cassette before shifting chainrings is a slightly more advanced technique that requires some practice to master. Doing so minimizes the effect of switching between chainrings. For example, quickly downshift two gears with one long press on the right shifter, then immediately move to the big chainring using the left shifters.
4. Don’t Shift When You Put Down Pressure
Don’t shift when the drivetrain mechanism is under lots of tension; otherwise, the chain could skip or come off. Avoid this by pedaling lightly until the gear change is made by guiding the pedals around using the existing momentum without actually pushing.
5. Do Regular Maintenance
It’s vital to keep your bike in good working order by periodically maintaining and cleaning the frame and components, especially the drivetrain. A system that isn’t lubed or is clogged with dirt and debris will not function correctly, causing loss of efficiency through poor shifting.
Read Next
Best Single-Speed & Fixie Bikes
Share this on:


this info was the best by far thank you
Glad you like it, Rhonda!
Thank you for the very valuable information. Bike Exchange
You are welcome, David! We’re happy that you found it useful!