How to Adjust a Rear Derailleur for Crisp and Precise Shifting
Adjusting bike gears is essential for maintaining effective and consistent shifting performance and avoiding issues with the drivetrain.
Bike rear derailleur adjustment is a fundamental part of tuning gears as the rear derailleur guides the chain from cog to cog on the cassette.
This article will help you understand what each part does, how to make the different adjustments, the order to make the adjustments, and how to fix common issues.
Save both money and time by easily learning this basic bike maintenance skill.
Bicycle Derailleur Adjustment: First Things First
The goal of bike derailleur adjustment is to align the rear derailleur with the individual cogs and set the shifting limits to ensure smooth, accurate gear shifting.
Bicycle derailleur adjustment involves the calibration of four different things:
- Derailleur alignment (the rear derailleur should be parallel to the drivetrain and frame)
- Cable tension
- Limit screws
- B-Tension (body angle)
But before attempting to adjust a rear derailleur on your own, you should first learn how it works. On top of that, keep in mind that adjusting a rear derailleur with electronic shifting works differently and is done using an app.
Familiarize Yourself With Rear Derailleur Parts
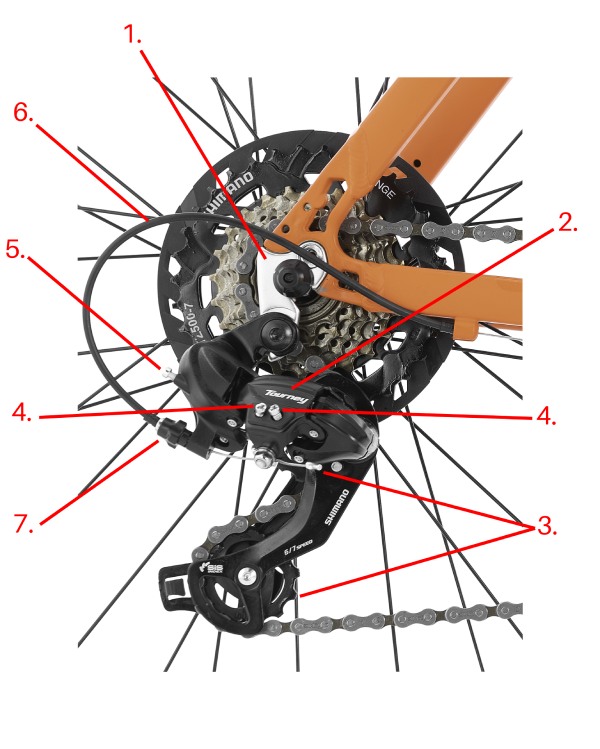
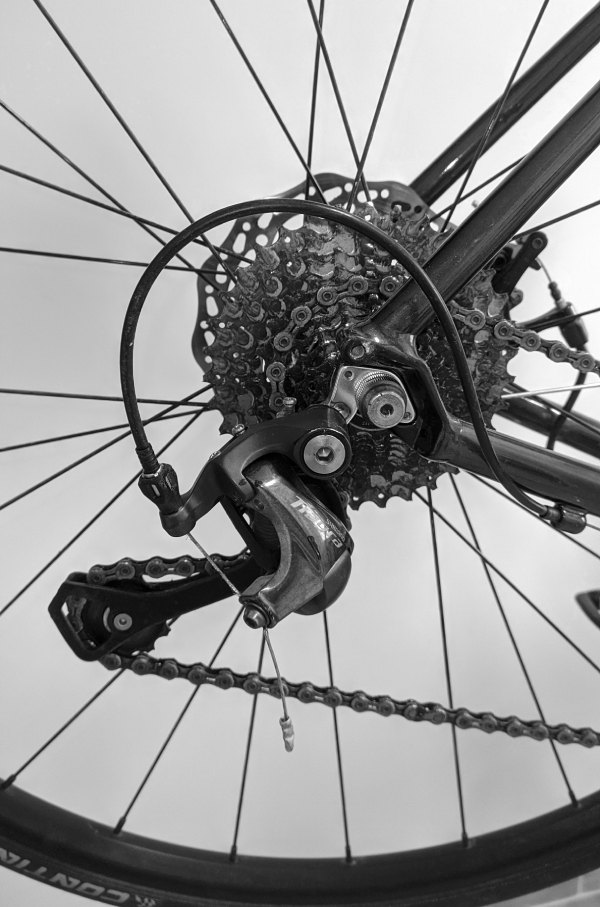
The rear derailleur comprises several parts, making it one of the most intricate components of a bike. Let’s take a brief look at each component:
- Derailleur hanger – Designed to break in case of a fall and save your derailleur. It also connects the derailleur to the frame.
- Derailleur body and cage – The body has an upper and lower pivot (held together by a linkage system). It guides the cable and houses the screws. The cage extends below the body holding the pulleys.
- Guide and tension pulleys (jockey wheels) – Two metal discs with teeth that guide the chain from cog-to-cog and take up the slack (creating tension) while it changes between sprockets.
- Limit screws (L & H) – Rear derailleur limit screws restrict how much the derailleur moves inwards (L – low/largest cog) or outwards (H – high/smallest cog). They stop the chain from shifting off the cassette on either side.
- B-Tension screw – This screw controls the size of the gap between the guide pulley and the cassette. Tighten it to make the gap bigger; loosen it to make the gap smaller.
- Cable and Housing – The cable pulls the derailleur to move it (with the chain) inwards along the cassette. The housing is the plastic exterior which protects the cable.
- Barrel adjusters (derailleur and shift lever) – Use either barrel adjuster to take up cable slack and move the guide pulley inwards by turning counterclockwise. A clockwise turn does the reverse. Finding the correct barrel adjust position range ensures good shifting performance and helps fix a bike gear not shifting properly.
Check for Common Rear Derailleur Problems
Inefficient gearing can arise from rear derailleur problems or the other drivetrain issues below.
-
Chain Wear
A worn chain doesn’t sit correctly on the cassette or chainring teeth. If you have a bike skipping gears despite tuning your derailleurs and indexing, the chain might be worn out, requiring replacement..
How to Fix a Bike Chain — Replace & Resize a Bike Chain Easily
-
Worn Cassette and Chainrings
Pointed shark-fin teeth indicate excess wear on the cassette and chainrings. Highly worn parts require replacement to restore normal performance.
-
Bent Derailleur Hanger
If your derailleur is noticeably out of line, your derailleur hanger may be bent. A bent hanger typically requires replacement or the help of a professional bike mechanic.
-
Damaged Cable Housing or Derailleur Body
If these two parts get damaged, various issues can arise, leading to gear skipping, unresponsive shifting, or broken shifting. Begin by replacing cables and housing as this is the cheapest and quickest option.
-
Friction Inside the Cable System
A worn cable can lead to excess friction in the system. This friction makes it difficult for the return spring to move the derailleur down the cassette onto smaller cogs and necessitates replacing the cable.
-
Dirty Derailleur Body or Drivetrain
Before adjusting bicycle gears, ensure the drivetrain and derailleur body are clean. Dirt and debris accumulate quickly in this area and cause a drastic loss of efficiency, highlighting the importance of regular bike cleaning.
How to Adjust a Rear Derailleur: Step-by-Step Guide
Required tools
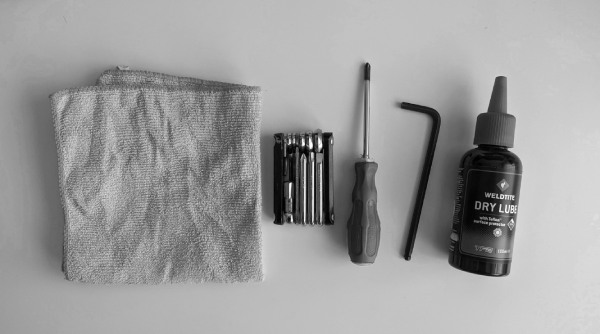
Required tools: a rag, multitool (optional), philips screwdriver, 5mm hex key, lube (optional).
You’ll need the following items to perform this bike tuning:
- Rags
- Repair stand (not a must, but very handy)
- Phillips screwdriver
- 5mm Hex (Allen) wrench
- Light lubricant
Once you have all of these tools and items in front of you, you can start the adjustment with step 1 below.
Step #1 – Check Alignment Before Making Adjustments
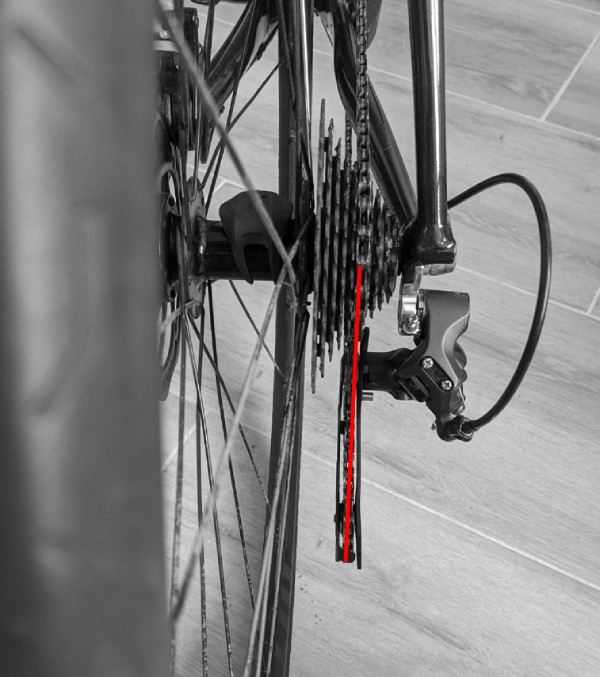
Make sure that the derailleur hanger is not bent and that the rear derailleur is parallel to the cassette.
- Check the alignment of the rear derailleur in relation to the frame and cassette. It should sit parallel to both. If not, your hanger may be bent.
- Shift to the large chainring in the front (if you have more than one) and shift outward to the smallest cog on the back. Once there, shift outward on the cassette again to ensure the derailleur is at the end of its range
Step #2 – Adjust the H Limit Screw
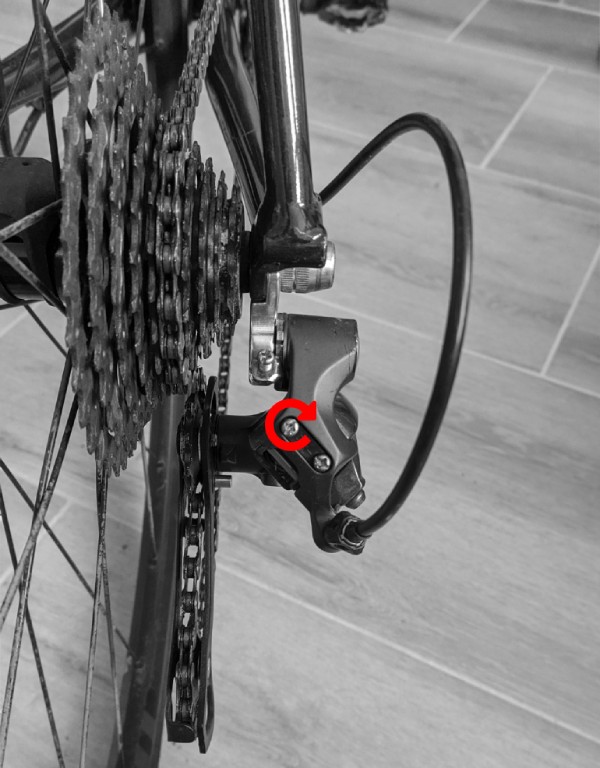
The goal here is to align the pulleys with the smallest cog. Turning the H-limit screw clockwise pulls the pulley cage inwards and counterclockwise pulls it outwards.
- If your limit screws are unmarked, test both. The H-limit screw only moves the derailleur when the chain is on the smallest cog
- If the derailleur cage doesn’t move out to the smallest cog, turn the barrel adjuster clockwise, this should cause the shift to happen
- Now, turn the barrel adjuster further clockwise two rotations; this allows us to set the H-limit screw
- Tighten the H-screw (clockwise) until the pulley cage sits slightly inside the smallest cog making it too tight. Listen for noise while pedaling (the chain touching the second smallest cog)
- Then, very slightly loosen the H screw (counterclockwise), checking each time until the pedaling noise is gone
- Finally, turn the barrel adjuster counterclockwise two rotations, resetting it to where it was
Step #3 – Indexing
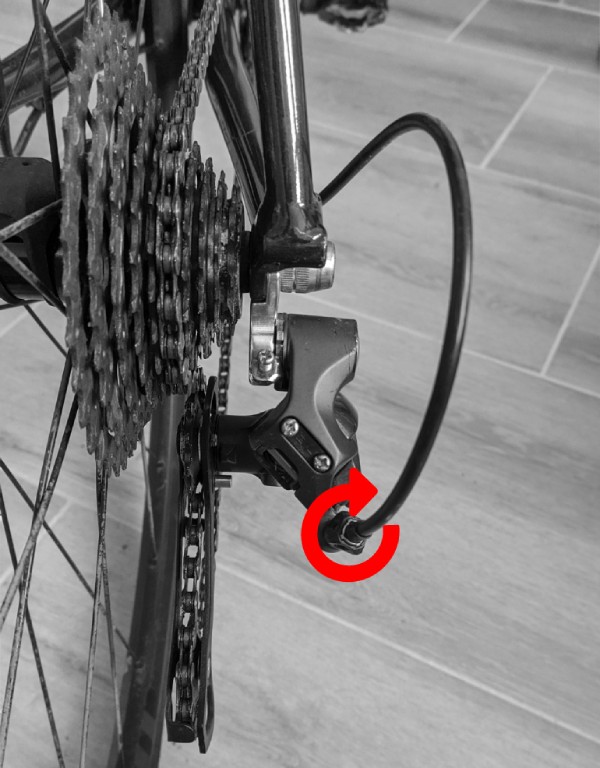
Use the barrel adjuster to index the gears. Indexing aligns the guide pulley under each cog, meaning each shift moves the appropriate distance.
Before starting, remember: Turn the barrel adjuster counterclockwise if the derailleur doesn’t shift inwards; turn it clockwise if it is slow/noisy when shifting outwards.
- Stay in the big chainring and smallest cog for 2x drivetrains; 3x drivetrains shift to the middle chainring
- Begin turning the pedals and shift onto the next sprocket. If it doesn’t move or it makes the shift, but the pedaling is noisy, turn the barrel adjuster counterclockwise and try the same shift until it works and there is no excess noise. If it shifts two gears, turn the barrel adjuster clockwise
- Next, while maintaining a steady pedaling cadence, shift one cog inwards. If there is noise when pedaling, turn the barrel adjuster a quarter-turn clockwise and test that shift again
- Repeat this process for each cog moving inwards except the largest, ensuring each shift works, and there is no excess noise while pedaling
- Finally, shift back out to the smallest cog, ensuring each shift performs well and doesn’t produce excess noise. If a gear change is slow or noisy coming back down the cassette, turn the barrel adjuster a quarter-turn clockwise and test again until it’s smooth
Step #4 – Adjust the L Limit Screw
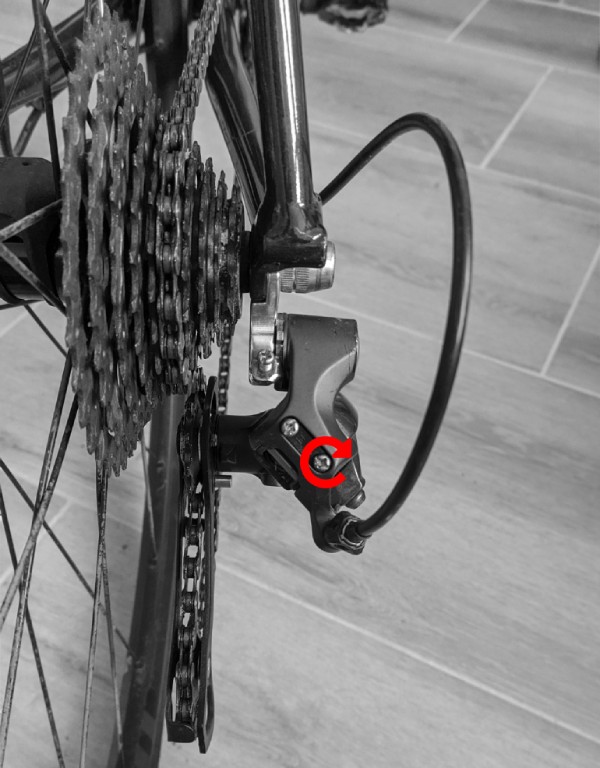
This step is to ensure the L-limit screw prevents the chain from slipping off the largest cog into the spokes.
- 2x drivetrains shift to the small chainring and the second-largest cog; 3x drivetrains change to the smallest chainring; 1x drivetrains shift to the largest cog.
- Like with the H-limit screw, the process is to over-tighten the L-limit and loosen it incrementally until the excess noise from pedaling disappears
- From the second-largest cog, shift to the largest. If it goes perfectly and doesn’t make noise while pedaling, tighten the L-limit one turn until that shift doesn’t work or there is noise while pedaling on the largest cog
- Return to the second cog, loosen the L-limiter slightly, re-try the shift.
- If pedaling is noisy, the gear change doesn’t work or is slow, repeat the previous step until it shifts perfectly and there is no excess noise
- To double-check the L-screw is set correctly, from the largest cog, attempt to shift inwards. The derailleur cage shouldn’t move inwards
Step #5 – B-Tension Screw Adjustment
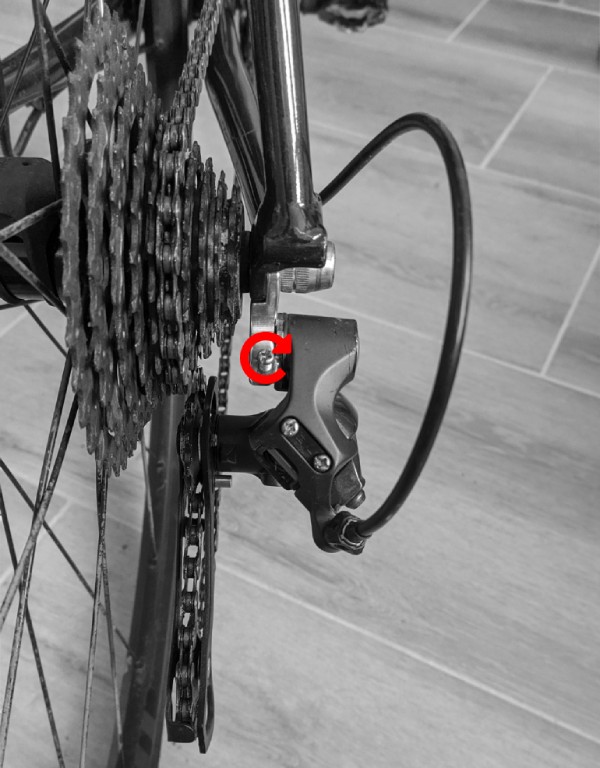
Poor B-screw tension can lead to impaired and noisy shifting performance. To increase the gap between the guide pulley and cogs, tighten the B-screw; loosen it to decrease the gap.
- Start from the smallest chainring and largest cassette cog
- Measure the distance between the pulley and the cog using your 5mm Hex key. The space should be the same as or very slightly wider than the Hex key
- If not, adjust accordingly
How to Fix Common Rear Derailleur Problems
If you have adjusted your rear derailleur and indexed the gears as described above, yet problems persist, you can try troubleshooting.
Troubleshooting rear derailleur issues involves identifying the symptom and matching it with one of the likely causes. Let’s look at some common problems and solutions so you can troubleshoot how to fix a derailleur.
-
The chain drops off in the highest and/or lowest gears
If your chain drops off the smallest cog, your H-limit screw is probably not in the correct position. Follow step two in the previous section to adjust it.
If your chain drops off the largest cog, your L-limit screw is probably set incorrectly. Follow step four to adjust the L-limiter. A bent hangar can also cause the chain to drop off either end.
-
The rear derailleur won’t shift up or down with a single click
Derailleur gears may not be indexed. Turn the barrel adjuster counterclockwise if the derailleur doesn’t shift inwards; turn it clockwise if it is slow/noisy when shifting outwards. Follow step three above for complete instructions on indexing.
-
The derailleur makes a knocking noise when pedaling the bike
If there is a knocking noise when pedaling the bike, the b-limit screw may need adjusting to increase the distance between the pulley wheel and the cassette.
Tighten the B-screw to increase the distance between the pulley and the cassette.
-
The system shifts slowly or hesitantly in either direction
If shifting is slow in either direction, the cable system could be damaged or perform poorly due to rust or dirt buildup inside the housing. First, try adding some light lubricant inside the housing. If the problem persists, consider replacing the cables and the housing.
-
Chain skips under pressure, especially in the favored gear
If the chain is skipping and regularly slipping, especially in the gear you use most, it’s probable the chain, cassette, or chainring is worn down. To identify worn cogs, look for pointed teeth like shark-fins. This is one of the main advantages of belt-drive bikes over traditional bicycles.
You May Also Ask
How to adjust the rear derailleur?
Adjust the rear derailleur by adjusting the H-limit screw, setting cable tension to index the gears, setting the L-limit screw, and finally, calibrating the B-screw tension. This can be challenging to do if you’ve never done it before, but you will save time and money by mastering it.
How to adjust a Shimano rear derailleur?
Shimano rear derailleur adjustment involves the standard process; set the H-limiter, calibrate cable tension using the barrel adjuster, set the L-limiter, and adjust the B-tension screw. Low-tier Shimano rear derailleurs require more frequent adjustments, whereas high-tier models don’t need adjusting that often.
How to adjust a rear derailleur on a mountain bike?
Check alignment, set the H-limiter, calibrate cable tension using the barrel adjuster, set the L-limiter, and adjust the B-tension screw if necessary. Make sure that you double-check if the derailleur hanger is straight as this is a common problem on mountain bikes due to more frequent falls.
How to adjust a rear derailleur on a road bike?
Adjusting a rear derailleur on a road bike is the same as on any other type. Basically, you should check alignment, set the H-limiter, calibrate cable tension using the barrel adjuster, set the L-limiter, and adjust the B-tension screw if necessary.
How to adjust rear derailleur tension?
To adjust the rear derailleur tension properly and get your bike to shift gears smoothly, you should shift to the smallest cog, loosen the cable pinch bolt, lightly pull the slack out of the cable, and then close the pinch bolt.
How to install a rear derailleur?
Installing a rear derailleur is pretty straightforward, as there are only a few steps to take. First, ensure the derailleur hanger is screwed onto the frame and then take the derailleur and use your 5mm Hex key to screw the mounting bolt clockwise into the hanger until it’s tight.
Alternative to a bicycle chain?
The best and most popular alternative to a bicycle chain is a belt drive system. Belt drives are extremely durable and easy to use as they require almost zero maintenance and last well over 10,000 kilometers. They are perfect for touring, city, and fitness bikes.
Read Next
Groupset Overview: Shimano, SRAM, Campagnolo, SunRace, microSHIFT


I am constantly distracted by the amount of adds on your excellent site, interfering when trying read.
I am 82 and have been in the motor trade, cars and motorcycles all my working career. The older you get the harder it is to absorb the descriptions. Please stop them. No open reads them anyway.
On an Android phone, the ads so overwhelm this article it’s impossible to read.
Thank you for sharing your opinion, D.H. We’ll consider decreasing the number of ads.
use firefox with ublock origin
It seems to me that the problem is in the shift lever. When I could upshift but with difficulty, you had to push on the upshift lever just right to get it to shift; usually I’d have to press two or three times, and/or hold it in the pressed-in position, to get it to shift. But I don’t see any guidance about that end of things.
Hey RT, it’s really hard to diagnose a shifting problem from afar, but it seems to me that you have lost tension in your cables or there is too much tension.
You could try to follow these steps:
1. Release the shifting cable from the rear derailleur.
2. Put the shifter in the highest gear.
3. Turn the barrel adjuster counter-clockwise a few times.
4. Move the chain to the smallest rear cog.
5. Pull the end of the cable with your fingers or a set of pliers as much as you can and tighten the screw that holds it in place.
Now see if it works any better. If not, your shifter might be broken and it’s best to take the bike to a mechanic.
After I got my bike tuned up last summer, it upshifted (from larger to smaller, outer sprockets) with some difficulty on the rear derailleur, but it was manageable. Now it won’t do it AT ALL – it’s stuck on the largest, innermost sprocket (the lowest, innermost gear).
The barrel adjuster is turned clockwise as tightly as it’ll go.
Any suggestions?
I’m 80. The angle on the chain between the front largest gear to the rear largest gear doesn’t allow the chain to drop to a lower gear when pedaling backwards! It seems to shift ok does not go into the
Spokes..and normal pedaling of all gears seems OK when normal pedaling! The angle is quite visible!
Hey JP, you should always avoid cross-chaining, i.e. riding in the front largest gear and rear largest gear (or vice versa) to avoid potential issues with drivetrain performance and postpone wear and tear of the components. Keep the chain as straight as possible when shifting gears.