How to Remove, Replace, or Install Bike Pedals: Easy Step-by-Step Guide
Knowing how to change bike pedals correctly is essential to owning a bike. The reasons you may want to change yours include if you’re going to try out clipless pedals or pack your bike for travel, it’s a good skill to know how to remove bicycle pedals. In this guide, we will walk you through this (quite easy) process.
Removing bike pedals is straightforward, so long as you follow some basic advice to do the job correctly, and it may require a lot of force. Likewise, installation isn’t too difficult but requires closer attention due to the design of bike pedal threads.
Tools Required for Changing Bike Pedals
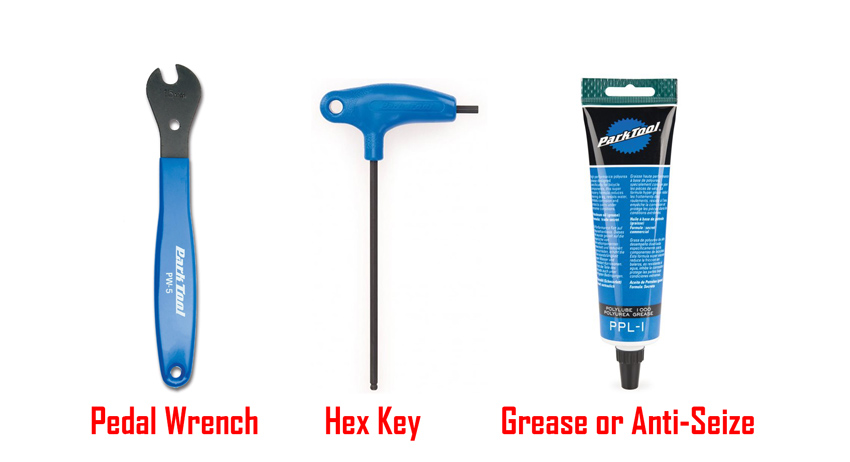
These are all the tools you will need, which every cyclist should have in their bike tool kit. You can find all of these online or in your local bike shop.
- Standard 15mm wrench or bike pedal wrench (pedal spanner), primarily for flat pedals
- 8mm or 6 mm hex key (Allen wrench), primarily for clipless pedals
- Grease or anti-seize
- Old rag
- Bike Repair stand (not essential)
Ideally, you want a hex key (Allen key) or wrench with a long handle that will allow you to get enough leverage if the pedals are very tight, which usually happens if they haven’t been removed in a long time.
Before You Start: Pedal Threads!
Shimano pedals typically have arrows pointing the right way to tighten.
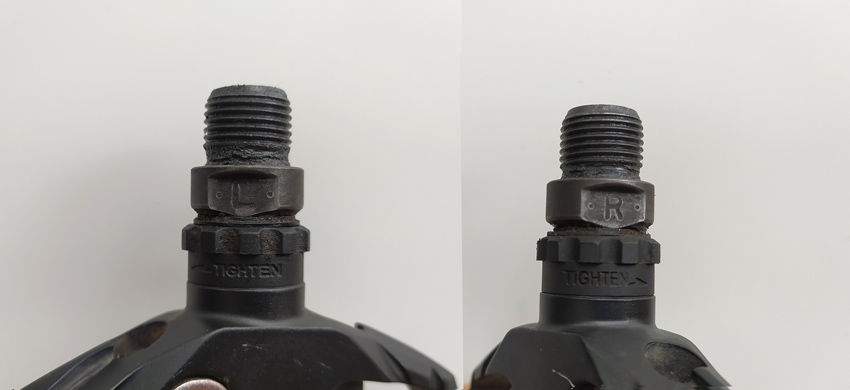
Bike pedal thread direction is unusual and can cause much confusion for cyclists.
The reason for this is that the threads are opposing, meaning that the drive side pedal follows the standard thread logic: turn left to loosen, turn right to tighten (righty tighty, lefty loosey); the non-drive side turns left to tighten, right to loosen, which is a reverse thread. Although it doesn’t sound complicated when written, it can feel quite counterintuitive when you’re doing it.
The easiest way to remember how pedal threads work: both pedals tigthen by turning forward (toward the front of the bicycle) and loosen by turning backward (toward the rear of the bike).
Another way to remember how to remove bike pedals is to place your wrench on the wrench flats at the end of the pedal spindle or in the hex slot on either side. Then, pedal the crankarm forward while keeping the tool stationary, and the pedals will loosen.
Thankfully, almost all pedals are marked to help users identify the side. Some manufacturers print an L or R on the body of the pedal, like Shimano; others print it on the flat end of the pedal’s screw. If the marking has worn off or there is none, you can distinguish between them by looking at the thread. The left-hand thread will slop up to the left, and the right-hand thread will slop up to the right.
How to Remove Bike Pedals
Before starting with the removal or replacement, shift the chain onto the large chainring to protect your hands from the chainring teeth, just in case the tool slips while applying pressure to tighten or loosen the pedals.
Additionally, if you have Shimano pedals, take note of the narrow lock bolt on the inside, at the end of the pedal axle. This bolt is for servicing the pedal axle itself, not installing and removing it, so don’t loosen it.
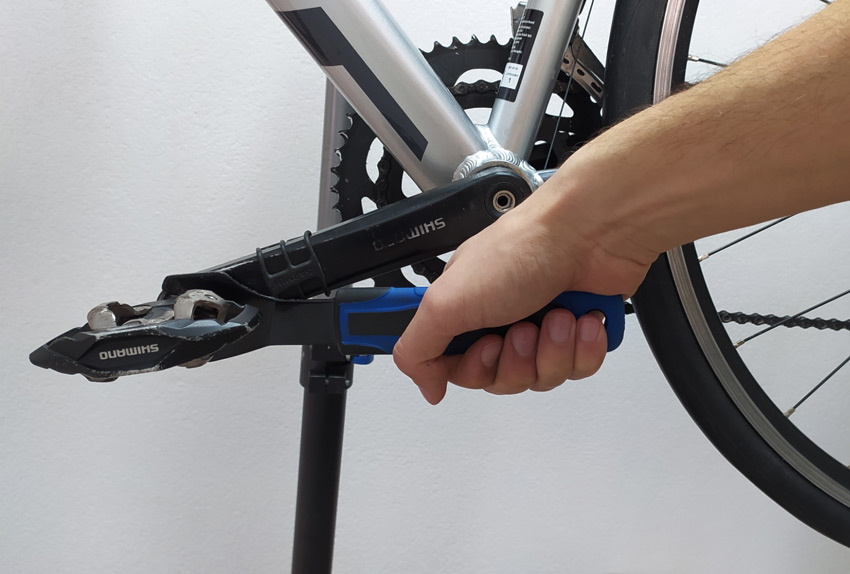
Right Pedal Removal — Drivetrain Side
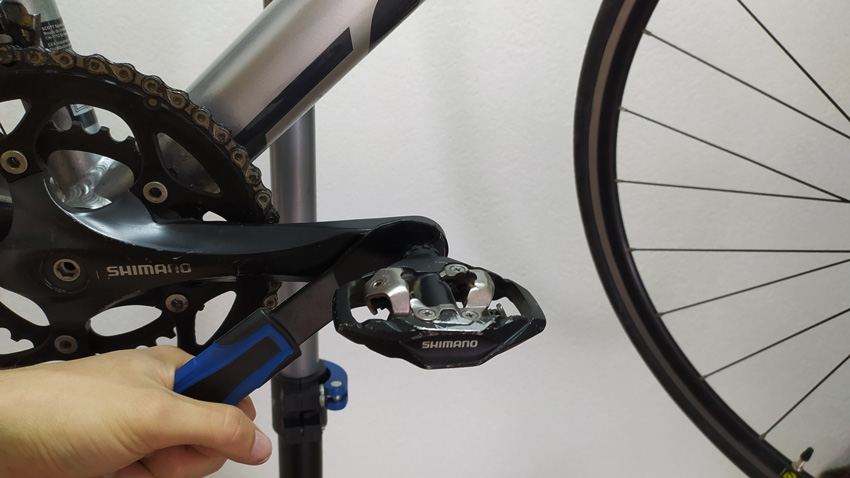
Push down in this position to remove the pedal.
- Begin by placing the right crank between three and six o’clock.
- Take your wrench and place it onto the nut’s wrench flats. Place the key into the hex keyhole on the other side of the pedal for hex keys.
- Ensure the long end of the tool handle is pointing towards the back of the bike.
- Once in place, hold the left pedal/crank arm in place with your other hand, and push the handle of your tool toward the floor to loosen the pedal.
- Once the locking nut pedal is slightly loose, finish unscrewing by hand. For hex key pedals, finish unscrewing with the opposite side of the hex key, twisting lightly with your fingers.
Stuck Pedals?
You may need more force or leverage for particularly tight pedals to unstick them initially. First, try putting the bike on the ground, lean your weight over it, and repeat the process, pushing down on the tool and pulling up the left side crank.
This angle will give you much great mechanical advantage. Alternatively, your tool handle may be too short, reducing the leverage you can apply, so try a tool with a longer handle.
Left Pedal Removal — Non-Drivetrain Side Pedal
Push down in this position to remove the pedal.
Left pedal removal follows an almost identical process to the right-hand pedal, with one minor change. First, rotate the left crank to the nine o’clock position. Then, follow the same method above to remove the left pedal. With the tool in place and facing the back of the bike, hold the left crank in place and push down on the tool’s handle.
Fitting New Pedals
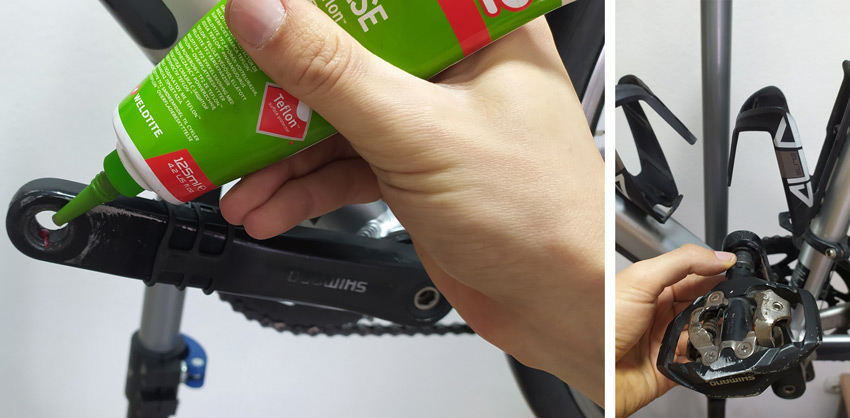
Clean the threads thoroughly and add a small amount of grease or anti-seize. Then install the pedals by turning the left pedal in the anti-clockwise direction and the right pedal clockwise.
Once the pedals are off, it’s time to thoroughly clean the inner thread of the cranks with your rag. Additionally, if you’re reinstalling old pedals, ensure the pedal thread is also completely clean. Any dirt on the threads can compromise the connection, causing it to loosen or seize over time.
Once the threads are clean, apply a thin layer of grease or anti-seize to the pedal thread, do not skip this step (chain lube isn’t effective). Some manufacturers require the use of a washer in between the pedal and the crank (such as carbon fiber cranks), so consult your owner’s manual before installation.
- Begin installation by hand—right side turns right to tighten, left side turns left.
- Once tightened a few turns by hand, place the short end of your key into the hole (the handle will be facing toward the front of the bike, and finish tightening using the force generated by your wrist. That will be tight enough (alternatively, you can use a torque wrench).
- If you’re struggling to get the thread to grip or turn the pedal, double-check it’s the right side. Mixing sides is a common mistake, and you don’t want to damage the thread by forcing it into the wrong side.
- If you’re sure it’s the correct side, you can try to get the pedal to grip using the tool instead of your hands.
- Finally, once your pedals are tight, double-check to ensure they are secure without any side-to-side movement, then you’re ready to go!
See how easy it was? Have questions? Ask in comments!
Read Next
Best Gravel Bike Pedals — Our Top Choices of Best Pedals for Off-Road Rides
Shimano SPD vs. SPD-SL Pedals — Which Ones to Choose?
Clipless vs Flat Pedals: Is a Flat or Clipless Pedal Better for You?
Share this on: