Essential Bike Hand Signals for Group Rides and Commuting
Source: bicyclensw.org.au
Bike hand signals are a fundamental part of riding a bike safely on the road, whether alone or in a group. They allow riders to communicate with other road traffic and be predictable.
When done correctly and in a timely fashion, hand signals for bike riding allow you to provide road users with the information they need to stay safe and avoid incidents or accidents.
This article will cover how and when to do each bike hand signal commonly used by commuters and riders on group rides.
How to Signal on a Bike Without Falling
Bike riding hand signals are important for cycling safety but they require the ability to ride one-handed.
In addition, you must be able to cycle with one hand if you want to drink or eat while on a ride without stopping. Riding with one hand takes practice and confidence to do safely.
In the beginning, practice the technique in a quiet residential area or large parking lot to develop the skill. Then, progress by riding with one hand in various situations on the road and at different speeds to become proficient and confident.
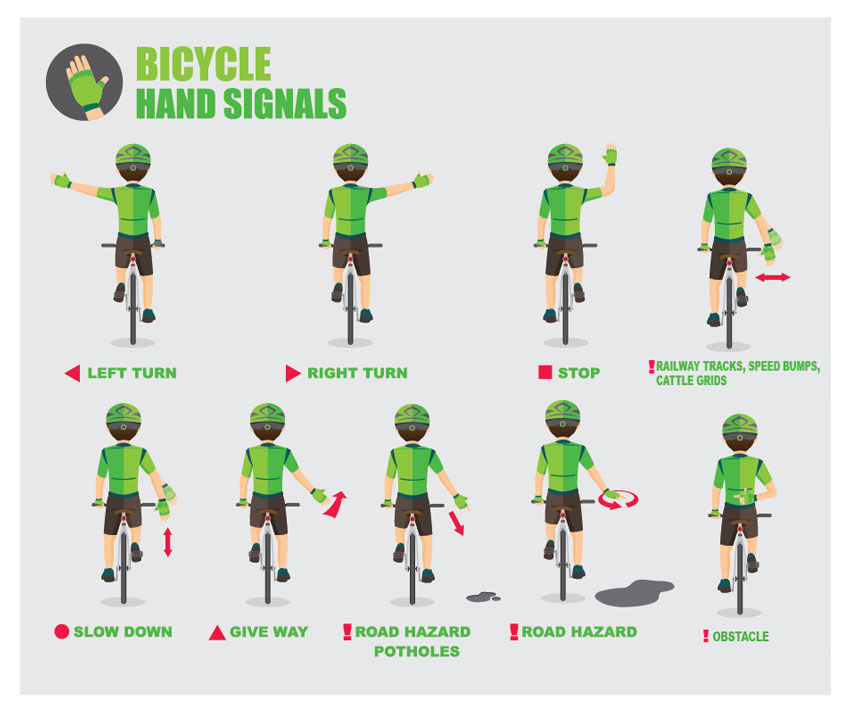
Basic Bike Hand Signals for Commuting and Group Riding
You should use the following four bike traffic signals for signaling to all road users, whether riding alone or in a group as part of general cycling etiquette.
These include turning and the slowing or stopping signals.
It’s essential to give plenty of notice to those around you. In busy urban areas, provide slightly more time than you would on quieter rural roads.
Before signaling any turn, overtake maneuver, or position change within your lane, check over your shoulder to ensure nothing is passing you.
Once you perform the shoulder check, execute the signal, then check once more before moving.
Turning Left
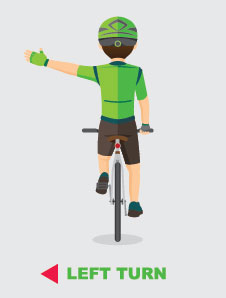
How: Extend your left arm horizontally to shoulder height to indicate a left turn, pointing your index finger.
When: Utilize this signal up to 300 feet before a left turn and hold it for two or three seconds until you begin executing the turn.
Additionally, utilize a left signal to indicate to the vehicles behind that you’re about to overtake another cyclist or pedestrians on the road.
When turning left, ensure you move to a central to left part of your lane, so any trailing traffic doesn’t attempt to pass you just before you make the turn.
Turning Right
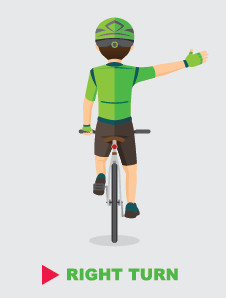
How: Two right bike turn hand signals are generally accepted under traffic guidelines.
The most common is to raise your right arm straight out and up to shoulder level, pointing your index finger (as with the left turn). Alternatively, raise your left arm up and bend your elbow to 90 degrees with your palm facing forward.
When: Use the right turn signal up to 300 feet before a right turn and hold for two or three seconds before turning. In addition, use a right-turn signal to move back in after an overtake maneuver.
Always turn right from the center of the lane or slightly to the right. Avoid turning right across the lane.
Slowing Down

How: Indicate you’re about to reduce your speed by raising your arm to a 45-degree angle, elbow slightly bent, and palm facing down parallel to the ground. Then, lift and lower the hand three or four times(almost like you’re dribbling a basketball).
When: Utilize this signal when you want to indicate to cars behind you that you’re going to slow down due to a change in the road ahead that may not be visible to those behind you. Do this before applying the brakes sharply, when possible.
Stopping
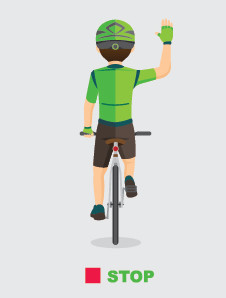
How: Raise your arm out, with your elbow bent at roughly 90 degrees, your hand down, and your palm facing backward.
When: Indicate a stop if you’re going to stop to get off the bike or approaching something on the road ahead that will require a stop.
Initiate this signal three or four seconds before stopping, and hold it while you pull the brakes to stop if you’re comfortable doing that. If not, make the signal, return your hands to the handlebar, and slow down.
Essential Bike Hand Signals for Group Riding Only
Some hand signals for bikes are only for riding in groups. These signals help point out obstacles in the road or indicate changes relevant to riders drafting closely behind you.
Drafting in a group ride significantly reduces your visibility of the road ahead and means hand signals on a bike are even more important, as you rely on those ahead to provide warnings.
If you don’t have time to signal with your hand, it’s acceptable to give a loud shout over your shoulder to the riders behind you. For example, “POTHOLE!”.
Passing On Bike Hand Signals
Passing on any signal you receive when riding in a group is vital. The only way for the whole group to stay safe is for each rider in the line to pass the message through. Again, if you don’t have time to make the physical gesture, utilize your voice to warn those behind.
Signal Road Hazard
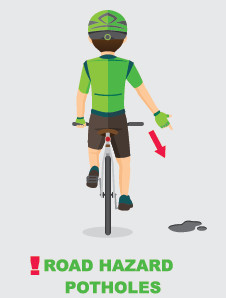
How: Point your hand toward the hazard (pothole, crack, glass) with your index finger pointing at it on whichever side it will pass. If you can, follow the hazard with your finger pointed at it as you pass it.
When: Use these cycling hand signals for anything on the road that could damage a tire or wheel or cause you to crash or lose control. Two or three seconds of notice is plenty.
Gravel on the Road
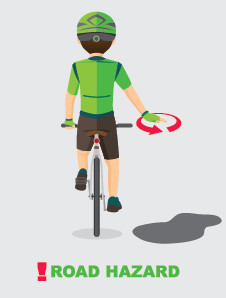
How: Point your hand downward and wave your hand or index finger in a circular motion toward the hazard.
When: This signal should be used whenever there’s something loose on the road that could cause the riders behind you to lose control or slip, such as sand, gravel, ice, debris, etc.
Railway Tracks, Speed Bumps, and Cattle Grids
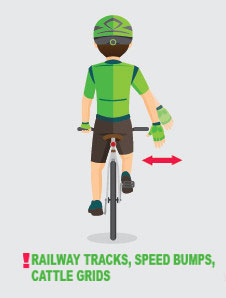
How: Point your hand downward and move it laterally to indicate an obstacle that runs across the road.
When: Use this signal when there’s an obstacle in front that runs across the road. Common examples include railway tracks, speed bumps, and cattle grids. It’s a good idea to also shout out the type of obstacle that’s coming up, so the riders behind you know exactly what to expect.
Overtaking Parked Car or Obstacle On the Road
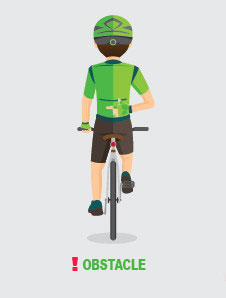
How: Put your right arm behind your back with your palm facing left. Then, make a sweeping motion with your hand from right to left.
When: If there is anything in the road ahead, like a parked car, a pedestrian walking on the road or multi-use path, or a slower cyclist that will require you to move left into the lane to pass safely. Try to give the riders behind you two or three seconds’ warning with this signal before reaching the obstacle.
Stopping Group Signal
How: Stretch an arm up with a slight bend in the elbow, and the palm pointed ahead to indicate to a large group that you’re about to stop.
When: If you’re riding in a large group and you need to make clear to the whole group that you’re going to stop. The previous arm-down signal described in the section above will only be visible to the rider or two or a car directly behind and may not provide enough warning to riders at the back of a big group.
Come Through
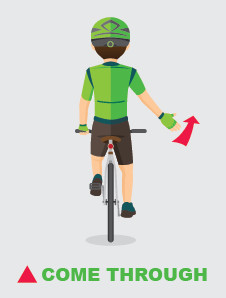
How: Point your elbow out or straighten your arm to the side and make a sweeping gesture from back to front, indicating the rider behind you to pass in front of you.
When: If it’s another rider’s turn to pull the group or you if you need to go to the back of the group for any reason. Also, if you want to indicate to motorists behind you that it’s safe to pass you.
Share this on: